It seems like someone we know is always getting married. Whether you’re a loyal member of the bride tribe or the blushing bride-to-be, honoring the big day consists of a lot more than just the wedding ceremony. From the bachelorette party to the bridal shower, planning memorable pre-marriage celebrations doesn’t have to be stressful! See our bridal celebration ideas below.

If you’re looking to plan an epic bachelorette party, why not an adults-only trip to Disney?? Kristy celebrated her sister-in-law’s upcoming nuptials with a weekend in the happiest place on Earth and had a blast! She recommends going without kids to Disney at least once in your life, because the experience is so different when you don’t have to worry about the little ones.

Make sure you grab matching magical tees, fun coordinating mouse ears, and, if you really want to get crazy, princess-themed outfits for going out at night!! We all know the bride is royalty, so what better occasion to show off your queenship.

After all of that celebrating, you’re probably going to want a little help recovery. These bachelorette party survival kits make the perfect gift for all the gals! Your bride and bridal party will be as good as new in no time with these essentials.

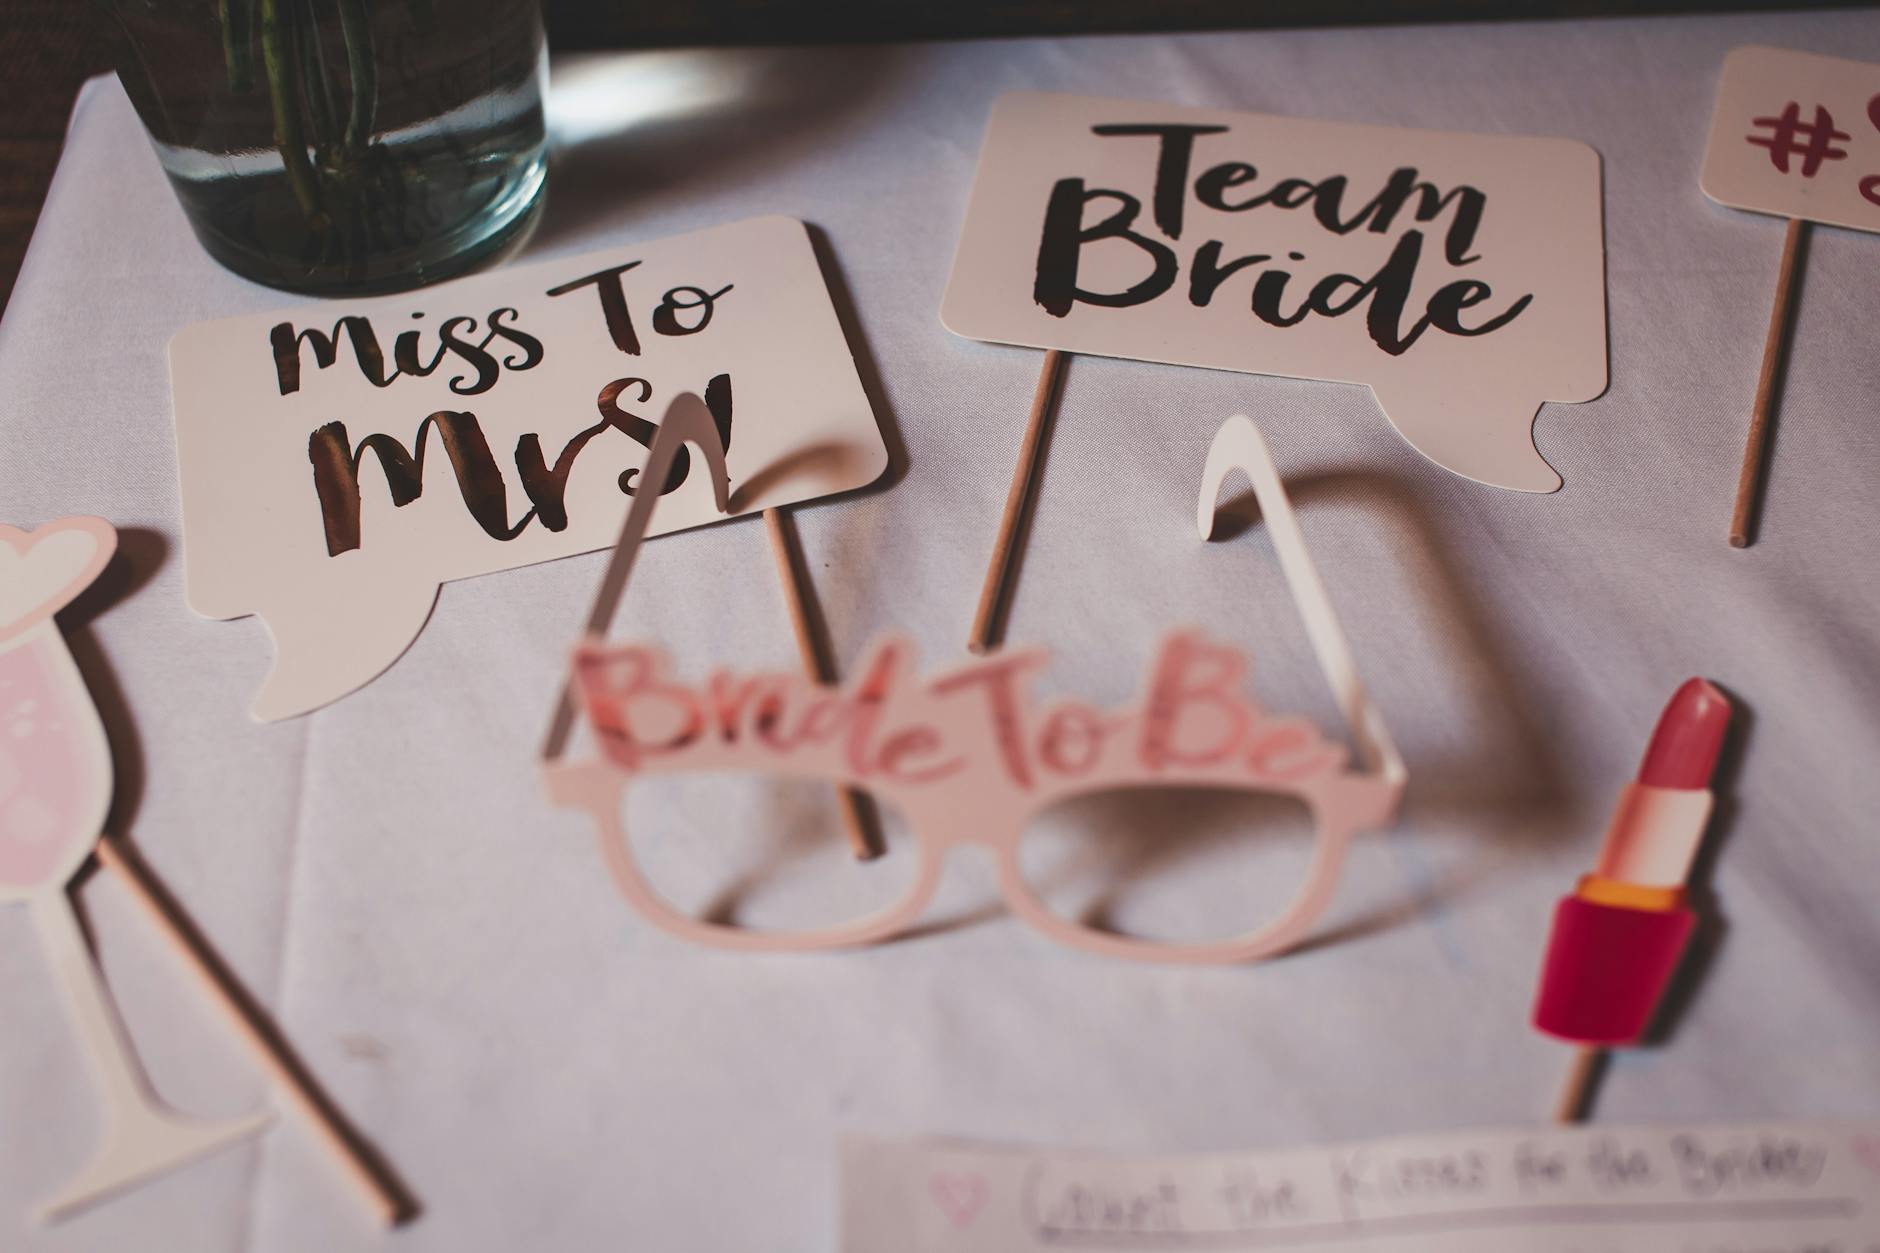
For a bridal shower, you’re going to want to gift something practical but something the bride wouldn’t necessarily buy for herself. How about this: a mini wine fridge with a customized wine subscription! Who wouldn’t want delicious wines delivered right to their door, especially with all that stress of wedding planning?! Don’t forget your “Miss to Mrs.” banner in case anyone forgot who all those gifts are for.

A “bride” silk robe is a must. Whether she wants to wear it on her wedding day or lounging around her house while she dreams of being the future Mrs., this is one bridal tradition you don’t want to forgo.

Games are a bridal shower must! This ring game is a fun way to get everyone involved and share a few laughs over some healthy competition.

These party favors are perfect for your bridal shower guests! Kiss the miss goodbye with Hershey’s Kisses and champagne lip balm. Pucker up!!
Want more bridal inspiration? Head to our Amazon storefront and get to planning!
It seems like someone we know is always getting married. Whether you’re a loyal member of the bride tribe or the blushing bride-to-be, honoring the big day consists of a lot more than just the wedding ceremony. From the bachelorette party to the bridal shower, planning memorable pre-marriage celebrations doesn’t have to be stressful! See our bridal celebration ideas below.
If you’re looking to plan an epic bachelorette party, why not an adults-only trip to Disney?? Kristy celebrated her sister-in-law’s upcoming nuptials with a weekend in the happiest place on Earth and had a blast! She recommends going without kids to Disney at least once in your life, because the experience is so different when you don’t have to worry about the little ones.
Make sure you grab matching magical tees, fun coordinating mouse ears, and, if you really want to get crazy, princess-themed outfits for going out at night!! We all know the bride is royalty, so what better occasion to show off your queenship.
After all of that celebrating, you’re probably going to want a little help recovery. These bachelorette party survival kits make the perfect gift for all the gals! Your bride and bridal party will be as good as new in no time with these essentials.
For a bridal shower, you’re going to want to gift something practical but something the bride wouldn’t necessarily buy for herself. How about this: a mini wine fridge with a customized wine subscription! Who wouldn’t want delicious wines delivered right to their door, especially with all that stress of wedding planning?! Don’t forget your “Miss to Mrs.” banner in case anyone forgot who all those gifts are for.
A “bride” silk robe is a must. Whether she wants to wear it on her wedding day or lounging around her house while she dreams of being the future Mrs., this is one bridal tradition you don’t want to forgo.
Games are a bridal shower must! This ring game is a fun way to get everyone involved and share a few laughs over some healthy competition.
These party favors are perfect for your bridal shower guests! Kiss the miss goodbye with Hershey’s Kisses and champagne lip balm. Pucker up!!
Want more bridal inspiration? Head to our Amazon storefront and get to planning!
If there’s one thing we know how to do at Frugal and Thriving, it’s shopping a really good sale. Our job is to be on top of the hottest and latest deals from all across the internet, and we’re rounding them up and putting them all in one place for you! See this week’s best sales from some of our favorite retailers below.
Aerie

Shop up to 30% off almost everything at Aerie!
Carter’s

Grab 40% off new arrivals from Carter’s!


Gap

Take 50% off your purchase at Gap
Michael Kors

Shop the End of Season Sale at Michael Kors and get up to 70% off!


Nike

It’s the Back to School Sale! Take 25% off select styles from Nike with code SPORT25
Old Navy

Back-to-school stock up!! Shop kids $5 tees & leggings, $6 polos & graphic tees, and $8 dress & active from Old Navy
Target

Grab college essentials starting at just $2 from Target!


Venus

Get up to 80% off thousands of styles from Venus!


Victoria’s Secret

Buy two, get one free everything at Victoria’s Secret!

If you ask people where they spend the majority of their time in their home, most would probably say their kitchen. The kitchen is the heart of the home and the main hub where, really, all the action happens. From starting the morning with a cup of coffee or a healthy breakfast to ending the day with a nourishing family meal, the kitchen starts and ends our days and sets the stage for a lot of scenes throughout our day. Whether you’re gossiping with girls over an afternoon glass of wine or sharing a sweet dessert with your kiddos after sundown, having an organized kitchen makes all the difference in your day-to-day operations, and that’s no exaggeration. See our kitchen organization ideas below.

If you start your day with a giant, delicious cup of coffee, having an organized and dedicated coffee station can help set the tone for your morning. Get yourself a nice coffee machine and milk frother, use this wooden riser to store your flavored syrups in pretty bottles, coffee pods, and stirring spoons, and start every day in your own mini cafe.

If you’ve got a family that you’re regularly cooking dinner for, chances are you end up with leftovers pretty regularly. Finding the right lid for the correct corresponding container in your jumbled Tupperware cabinet can honestly be the final straw of a really chaotic day. These drawer dividers will help take the stress out of saving the leftovers.

Use the dividers to organize your packed lunch supplies, too! From Bentgo boxes to mini Crockpots, these dividers will keep all of your on-the-go essentials in easy reach.

The worst thing is trying to find the utensil you need from the depths of your utensil drawer when you’re in the middle of cooking. With these drawer dividers you can quickly spot whichever tool you need and avoid a cooking crisis.

So. Many. Water bottles. If you’ve got a big family, then you know everyone wants their own water bottles and to-go tumblers. And one is never enough! You need different colors, pretty patterns, and all the sizes. Take your water bottle cabinet from a hectic mess to a fabulous haven of hydration with these organizers.

Opening your refrigerator and seeing clean, organized sustenance is, like, an incredible feeling. From a leftover pizza storage container to an egg organizer and see-through bins for everything else you can imagine, these refrigerator organization essentials will be life changing.

And for your drinks, these dispensers will make sure you never have to reach all the way to back to grab that last thirst-quenching beverage!

If you have a designated pull-out cabinet for your trash bin but you prefer using a motion sensor one or this just isn’t enough space for your garbage can, don’t let this cabinet go to waste! This hack with storage bins makes the most of this space by adding extra out-of-sight storage.

Cleaning supplies are a must, and it’s so easy for them to end up causing more of a mess when they’re shoved underneath your sink. These roll-out and stackable bins make cleaning supply storage a breeze.

The junk drawer always feels like a scary place to visit, but with the help of these drawer dividers, this will be your new favorite drawer! Keep all of your extra hardware and tools organized and easily available.

This extra towel bar is great for adding a splash of seasonal decor to your kitchen or for making sure you have plenty of extra dish towels within reach.
And if you’re looking to tackle your pantry, check out Kristy’s reorganization of her pantry here!
If you ask people where they spend the majority of their time in their home, most would probably say their kitchen. The kitchen is the heart of the home and the main hub where, really, all the action happens. From starting the morning with a cup of coffee or a healthy breakfast to ending the day with a nourishing family meal, the kitchen starts and ends our days and sets the stage for a lot of scenes throughout our day. Whether you’re gossiping with girls over an afternoon glass of wine or sharing a sweet dessert with your kiddos after sundown, having an organized kitchen makes all the difference in your day-to-day operations, and that’s no exaggeration. See our kitchen organization ideas below.
If you start your day with a giant, delicious cup of coffee, having an organized and dedicated coffee station can help set the tone for your morning. Get yourself a nice coffee machine and milk frother, use this wooden riser to store your flavored syrups in pretty bottles, coffee pods, and stirring spoons, and start every day in your own mini cafe.
If you’ve got a family that you’re regularly cooking dinner for, chances are you end up with leftovers pretty regularly. Finding the right lid for the correct corresponding container in your jumbled Tupperware cabinet can honestly be the final straw of a really chaotic day. These drawer dividers will help take the stress out of saving the leftovers.
Use the dividers to organize your packed lunch supplies, too! From Bentgo boxes to mini Crockpots, these dividers will keep all of your on-the-go essentials in easy reach.
The worst thing is trying to find the utensil you need from the depths of your utensil drawer when you’re in the middle of cooking. With these drawer dividers you can quickly spot whichever tool you need and avoid a cooking crisis.
So. Many. Water bottles. If you’ve got a big family, then you know everyone wants their own water bottles and to-go tumblers. And one is never enough! You need different colors, pretty patterns, and all the sizes. Take your water bottle cabinet from a hectic mess to a fabulous haven of hydration with these organizers.
Opening your refrigerator and seeing clean, organized sustenance is, like, an incredible feeling. From a leftover pizza storage container to an egg organizer and see-through bins for everything else you can imagine, these refrigerator organization essentials will be life changing.
And for your drinks, these dispensers will make sure you never have to reach all the way to back to grab that last thirst-quenching beverage!
If you have a designated pull-out cabinet for your trash bin but you prefer using a motion sensor one or this just isn’t enough space for your garbage can, don’t let this cabinet go to waste! This hack with storage bins makes the most of this space by adding extra out-of-sight storage.
Cleaning supplies are a must, and it’s so easy for them to end up causing more of a mess when they’re shoved underneath your sink. These roll-out and stackable bins make cleaning supply storage a breeze.
The junk drawer always feels like a scary place to visit, but with the help of these drawer dividers, this will be your new favorite drawer! Keep all of your extra hardware and tools organized and easily available.
This extra towel bar is great for adding a splash of seasonal decor to your kitchen or for making sure you have plenty of extra dish towels within reach.
And if you’re looking to tackle your pantry, check out Kristy’s reorganization of her pantry here!
The anticipation of summer break for students and teachers starts in the month of May, but as June soon comes around so do the end-of-year school party planning! Room parents unite! Themes, games, goodies…nothing is left out during this exciting time of the school year. This event doesn’t have to break the bank either as most things were purchased from the $1.25 store. We’ve got the behind-the-scenes deets on how Kristy and Krista put together their festive and summer fun and circus/carnival end-of-year school parties!

Photo Stations – An easy task with few supplies is all you need no matter your theme! Grab a tri-fold poster board, spray glue a tablecloth to it, then use construction paper to make the arrows and post. If you have a Cricut you can create the beach letters, or purchase sticker lettering – the hanging sun was a dollar store find. Have the students decorate felt frames with stickers or just grab some photo props!

A thick poster board with some decorative items like laminated signs, tinsel foil fringe and photo booth props is how this circus/carnival-themed photo backdrop was created. These photo booths can be used both outdoors and indoors, in case the weather isn’t cooperative.

Activities – Grab canvas tote bags, and again if you have a Cricut you can personalize them with each student’s name, or have the kids decorate them! Students can use fabric pens to sign each other’s bags and bring all of their party stuff home in them – such a creative and fun activity.

Sand art bottles and rock painting are a couple more artistic ways to celebrate the end of another school year. The bottles for the sand art are from the $1.25 store and another parent had some extra sand laying around so they were able to utilize that – look at how cute they turned out! Krista grabbed rocks from her garden and the students painted them, added their initials and year, and could either keep them or hide them around town for their friends to find!

Face painting is ALWAYS a hit no matter what kind of event you’re putting together, so it was an easy decision to add face painter to the lineup for the circus/carnival EOY party! If our readers are located in the South Jersey shore area, Amanda Desouza comes highly recommended! IG: MUABYAD

Games – The F&T fav...the prize punches make more appearances for both of these EOY parties! They are super easy to create and even more fun for the kiddos to play; just fill with fun prizes like temp tattoos, stickers, snap bracelets, and squishy toys and you’re ready to go. Use a disc drop game for some added flair so the kids can punch the cup based on whatever number they landed on!

Think classic games…you can’t have a carnival without ring toss, right, and this large outdoor blow-up ring toss game is the cutest! And who doesn’t love bingo?! Add on a colorful parachute paired with a beach ball, relay races, and water balloon toss using reusable water balloons for some team play, and voila!! These games will never go out of style and are perfect additions to a successful EOY celebration!

Snacks & Treats – Simple and sweet is all that is needed here. Simple is a cute little goody bag with some snacks like sliced fruit, Annie’s GF goldfish {always check for any classroom allergies}, and a juice box or small water. Popcorn is a fan fav, too, especially in those cute little popcorn bags! How sweet are the Ice-Pop filled buckets…all the summer vibes for the kids!
No matter what theme you choose or the size of your class, these EOY parties are always a hit and the kids who have worked hard all school year always have a blast. A big thanks to all of the parents like Kristy and Krista who go above and beyond to create these kinds of memories!
The anticipation of summer break for students and teachers starts in the month of May, but as June soon comes around so do the end-of-year school party planning! Room parents unite! Themes, games, goodies…nothing is left out during this exciting time of the school year. This event doesn’t have to break the bank either as most things were purchased from the $1.25 store. We’ve got the behind-the-scenes deets on how Kristy and Krista put together their festive and summer fun and circus/carnival end-of-year school parties!
Photo Stations – An easy task with few supplies is all you need no matter your theme! Grab a tri-fold poster board, spray glue a tablecloth to it, then use construction paper to make the arrows and post. If you have a Cricut you can create the beach letters, or purchase sticker lettering – the hanging sun was a dollar store find. Have the students decorate felt frames with stickers or just grab some photo props!
A thick poster board with some decorative items like laminated signs, tinsel foil fringe and photo booth props is how this circus/carnival-themed photo backdrop was created. These photo booths can be used both outdoors and indoors, in case the weather isn’t cooperative.
Activities – Grab canvas tote bags, and again if you have a Cricut you can personalize them with each student’s name, or have the kids decorate them! Students can use fabric pens to sign each other’s bags and bring all of their party stuff home in them – such a creative and fun activity.
Sand art bottles and rock painting are a couple more artistic ways to celebrate the end of another school year. The bottles for the sand art are from the $1.25 store and another parent had some extra sand laying around so they were able to utilize that – look at how cute they turned out! Krista grabbed rocks from her garden and the students painted them, added their initials and year, and could either keep them or hide them around town for their friends to find!
Face painting is ALWAYS a hit no matter what kind of event you’re putting together, so it was an easy decision to add face painter to the lineup for the circus/carnival EOY party! If our readers are located in the South Jersey shore area, Amanda Desouza comes highly recommended! IG: MUABYAD
Games – The F&T fav...the prize punches make more appearances for both of these EOY parties! They are super easy to create and even more fun for the kiddos to play; just fill with fun prizes like temp tattoos, stickers, snap bracelets, and squishy toys and you’re ready to go. Use a disc drop game for some added flair so the kids can punch the cup based on whatever number they landed on!
Think classic games…you can’t have a carnival without ring toss, right, and this large outdoor blow-up ring toss game is the cutest! And who doesn’t love bingo?! Add on a colorful parachute paired with a beach ball, relay races, and water balloon toss using reusable water balloons for some team play, and voila!! These games will never go out of style and are perfect additions to a successful EOY celebration!
Snacks & Treats – Simple and sweet is all that is needed here. Simple is a cute little goody bag with some snacks like sliced fruit, Annie’s GF goldfish {always check for any classroom allergies}, and a juice box or small water. Popcorn is a fan fav, too, especially in those cute little popcorn bags! How sweet are the Ice-Pop filled buckets…all the summer vibes for the kids!
No matter what theme you choose or the size of your class, these EOY parties are always a hit and the kids who have worked hard all school year always have a blast. A big thanks to all of the parents like Kristy and Krista who go above and beyond to create these kinds of memories!
The hallways are often-neglected areas of our home, and most of the time we don’t give them much thought. They mostly serve as a means of getting from point A to point B, but that doesn’t mean they don’t need and deserve love and attention. If your hallways are currently giving off “eh” vibes, you can easily turn up the wow factor with a little paint and a few modern touches. Don’t believe us? Kristy is here to show you just how easy it is! Check out her DIY hallway revamp below.
Before

I have been wanting to update my 1988 hallway since I began projects on my home – deciding what I wanted was the real question though. I began my research (aka pretty much watching millions of YouTube videos and reading a bunch of online forums), figured out a game plan, and gathered the supplies I’d need. A little detail on this hallway makeover: I’m never afraid of a little challenge, but this was my first time using power tools for a home renovation project, and let’s just say my entire family was on edge. I was also a tad nervous, but I was ready!
During

I immediately began by pulling all the old trim off the walls. I used a flathead and hammer to wedge and separate. A little bit of good, old-fashioned elbow grease got this part done in no time!

Once the trim was removed, I measured out where I wanted my boards to go and how far apart I wanted each one to be. After that was finished, I headed to Home Depot and picked out my trim for the baseboards and the walls. I recently had a renovation done and the contractor used this trim that I just loved, so I went with that same look.

I sat in the aisle at the store cutting board by board before I told myself, “I WILL NOT be doing this my whole project!!” That’s when I decided, “I’m getting an electric saw!” BEST DECISION EVER. The tool I grabbed was perfect for my project – my boards weren’t too thick, so the cuts were very precise. I used the blade that was included, but I recommend grabbing a few extra blades just in case. I began cutting my wood with my jigsaw tool. As I mentioned, this was my first experience with power tools, and this was a GREAT introduction tool. Now I feel like I need to do many more projects with this…it honestly was a great stress releaser!!

After the pieces were cut, I began gluing them to their designated spots with my wood adhesive, and then I followed it with my nail gun to ensure that it would stay in place! Brad nails were perfect for this project because they are so small, it doesn’t even look like nails were used. Tip: make sure you grab nails that fit your nail gun!

Once the boards were in place, I started with the caulking. I’m obsessed with this process for some reason – I really enjoyed smoothing out each crevice with my finger. I am a hands-on type of person, and this wasn’t my first time using caulk, so it was easier for me to do it this way. You can also purchase a special tool to help smooth it out, though! Don’t forget to caulk any holes from your Brad nail gun too, and then let the caulk dry overnight. Once the caulk had completely dried, I went over and sanded any areas that needed smoothing. If you have holes that need patching, I recommend doing that at the same time as your caulking.

After the sanding was done, I was so ready to get the paint on the walls. I fell in love with the color “Fine Black” by Magnolia Homes, which I had grabbed from Ace Hardware, and then picked a traditional white which I got from Home Depot. Once I started painting, the transformation really started to come to life!! I couldn’t put my paint brush down because I was so excited to see the finished product. I ended up using two coats of paint for both the black and white.
After
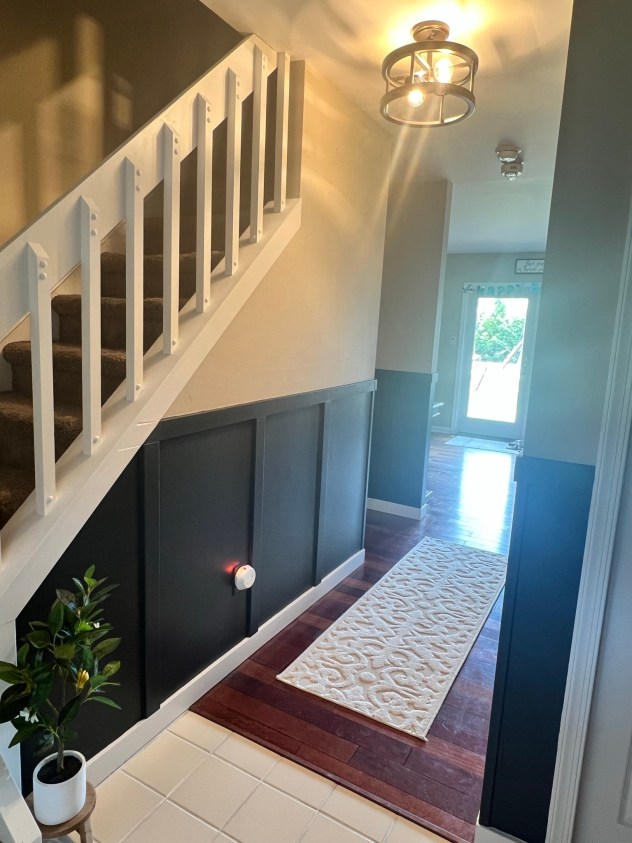
This project took me a total of 4 days and was worth every minute! I replaced the ceiling light with this new fixture and installed dimmable bulbs, and I added collages of family photos on every wall. It has made my 80’s home feel way more updated and CLEAN, and walking down my hallway gives me such a warm and inviting feel as I take a trip down memory lane. If I can do this with very minimal experience, there’s no doubt in my mind that you can too!
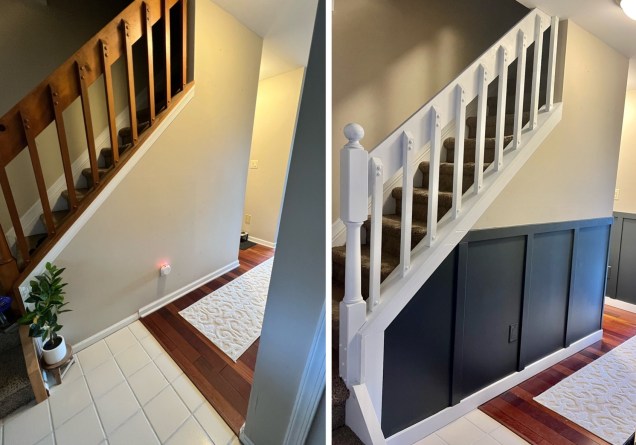
Such subtle changes can make the biggest differences! The revamped space looks so much more contemporary and open, and it’s a lot brighter now. Eventually I’ll redo the stairway too, but that’s a project for another day!

The hallways are often-neglected areas of our home, and most of the time we don’t give them much thought. They mostly serve as a means of getting from point A to point B, but that doesn’t mean they don’t need and deserve love and attention. If your hallways are currently giving off “eh” vibes, you can easily turn up the wow factor with a little paint and a few modern touches. Don’t believe us? Kristy is here to show you just how easy it is! Check out her DIY hallway revamp below.
Before
I have been wanting to update my 1988 hallway since I began projects on my home – deciding what I wanted was the real question though. I began my research (aka pretty much watching millions of YouTube videos and reading a bunch of online forums), figured out a game plan, and gathered the supplies I’d need. A little detail on this hallway makeover: I’m never afraid of a little challenge, but this was my first time using power tools for a home renovation project, and let’s just say my entire family was on edge. I was also a tad nervous, but I was ready!
During
I immediately began by pulling all the old trim off the walls. I used a flathead and hammer to wedge and separate. A little bit of good, old-fashioned elbow grease got this part done in no time!
Once the trim was removed, I measured out where I wanted my boards to go and how far apart I wanted each one to be. After that was finished, I headed to Home Depot and picked out my trim for the baseboards and the walls. I recently had a renovation done and the contractor used this trim that I just loved, so I went with that same look.
I sat in the aisle at the store cutting board by board before I told myself, “I WILL NOT be doing this my whole project!!” That’s when I decided, “I’m getting an electric saw!” BEST DECISION EVER. The tool I grabbed was perfect for my project – my boards weren’t too thick, so the cuts were very precise. I used the blade that was included, but I recommend grabbing a few extra blades just in case. I began cutting my wood with my jigsaw tool. As I mentioned, this was my first experience with power tools, and this was a GREAT introduction tool. Now I feel like I need to do many more projects with this…it honestly was a great stress releaser!!
After the pieces were cut, I began gluing them to their designated spots with my wood adhesive, and then I followed it with my nail gun to ensure that it would stay in place! Brad nails were perfect for this project because they are so small, it doesn’t even look like nails were used. Tip: make sure you grab nails that fit your nail gun!
Once the boards were in place, I started with the caulking. I’m obsessed with this process for some reason – I really enjoyed smoothing out each crevice with my finger. I am a hands-on type of person, and this wasn’t my first time using caulk, so it was easier for me to do it this way. You can also purchase a special tool to help smooth it out, though! Don’t forget to caulk any holes from your Brad nail gun too, and then let the caulk dry overnight. Once the caulk had completely dried, I went over and sanded any areas that needed smoothing. If you have holes that need patching, I recommend doing that at the same time as your caulking.
After the sanding was done, I was so ready to get the paint on the walls. I fell in love with the color “Fine Black” by Magnolia Homes, which I had grabbed from Ace Hardware, and then picked a traditional white which I got from Home Depot. Once I started painting, the transformation really started to come to life!! I couldn’t put my paint brush down because I was so excited to see the finished product. I ended up using two coats of paint for both the black and white.
After
This project took me a total of 4 days and was worth every minute! I replaced the ceiling light with this new fixture and installed dimmable bulbs, and I added collages of family photos on every wall. It has made my 80’s home feel way more updated and CLEAN, and walking down my hallway gives me such a warm and inviting feel as I take a trip down memory lane. If I can do this with very minimal experience, there’s no doubt in my mind that you can too!
Such subtle changes can make the biggest differences! The revamped space looks so much more contemporary and open, and it’s a lot brighter now. Eventually I’ll redo the stairway too, but that’s a project for another day!
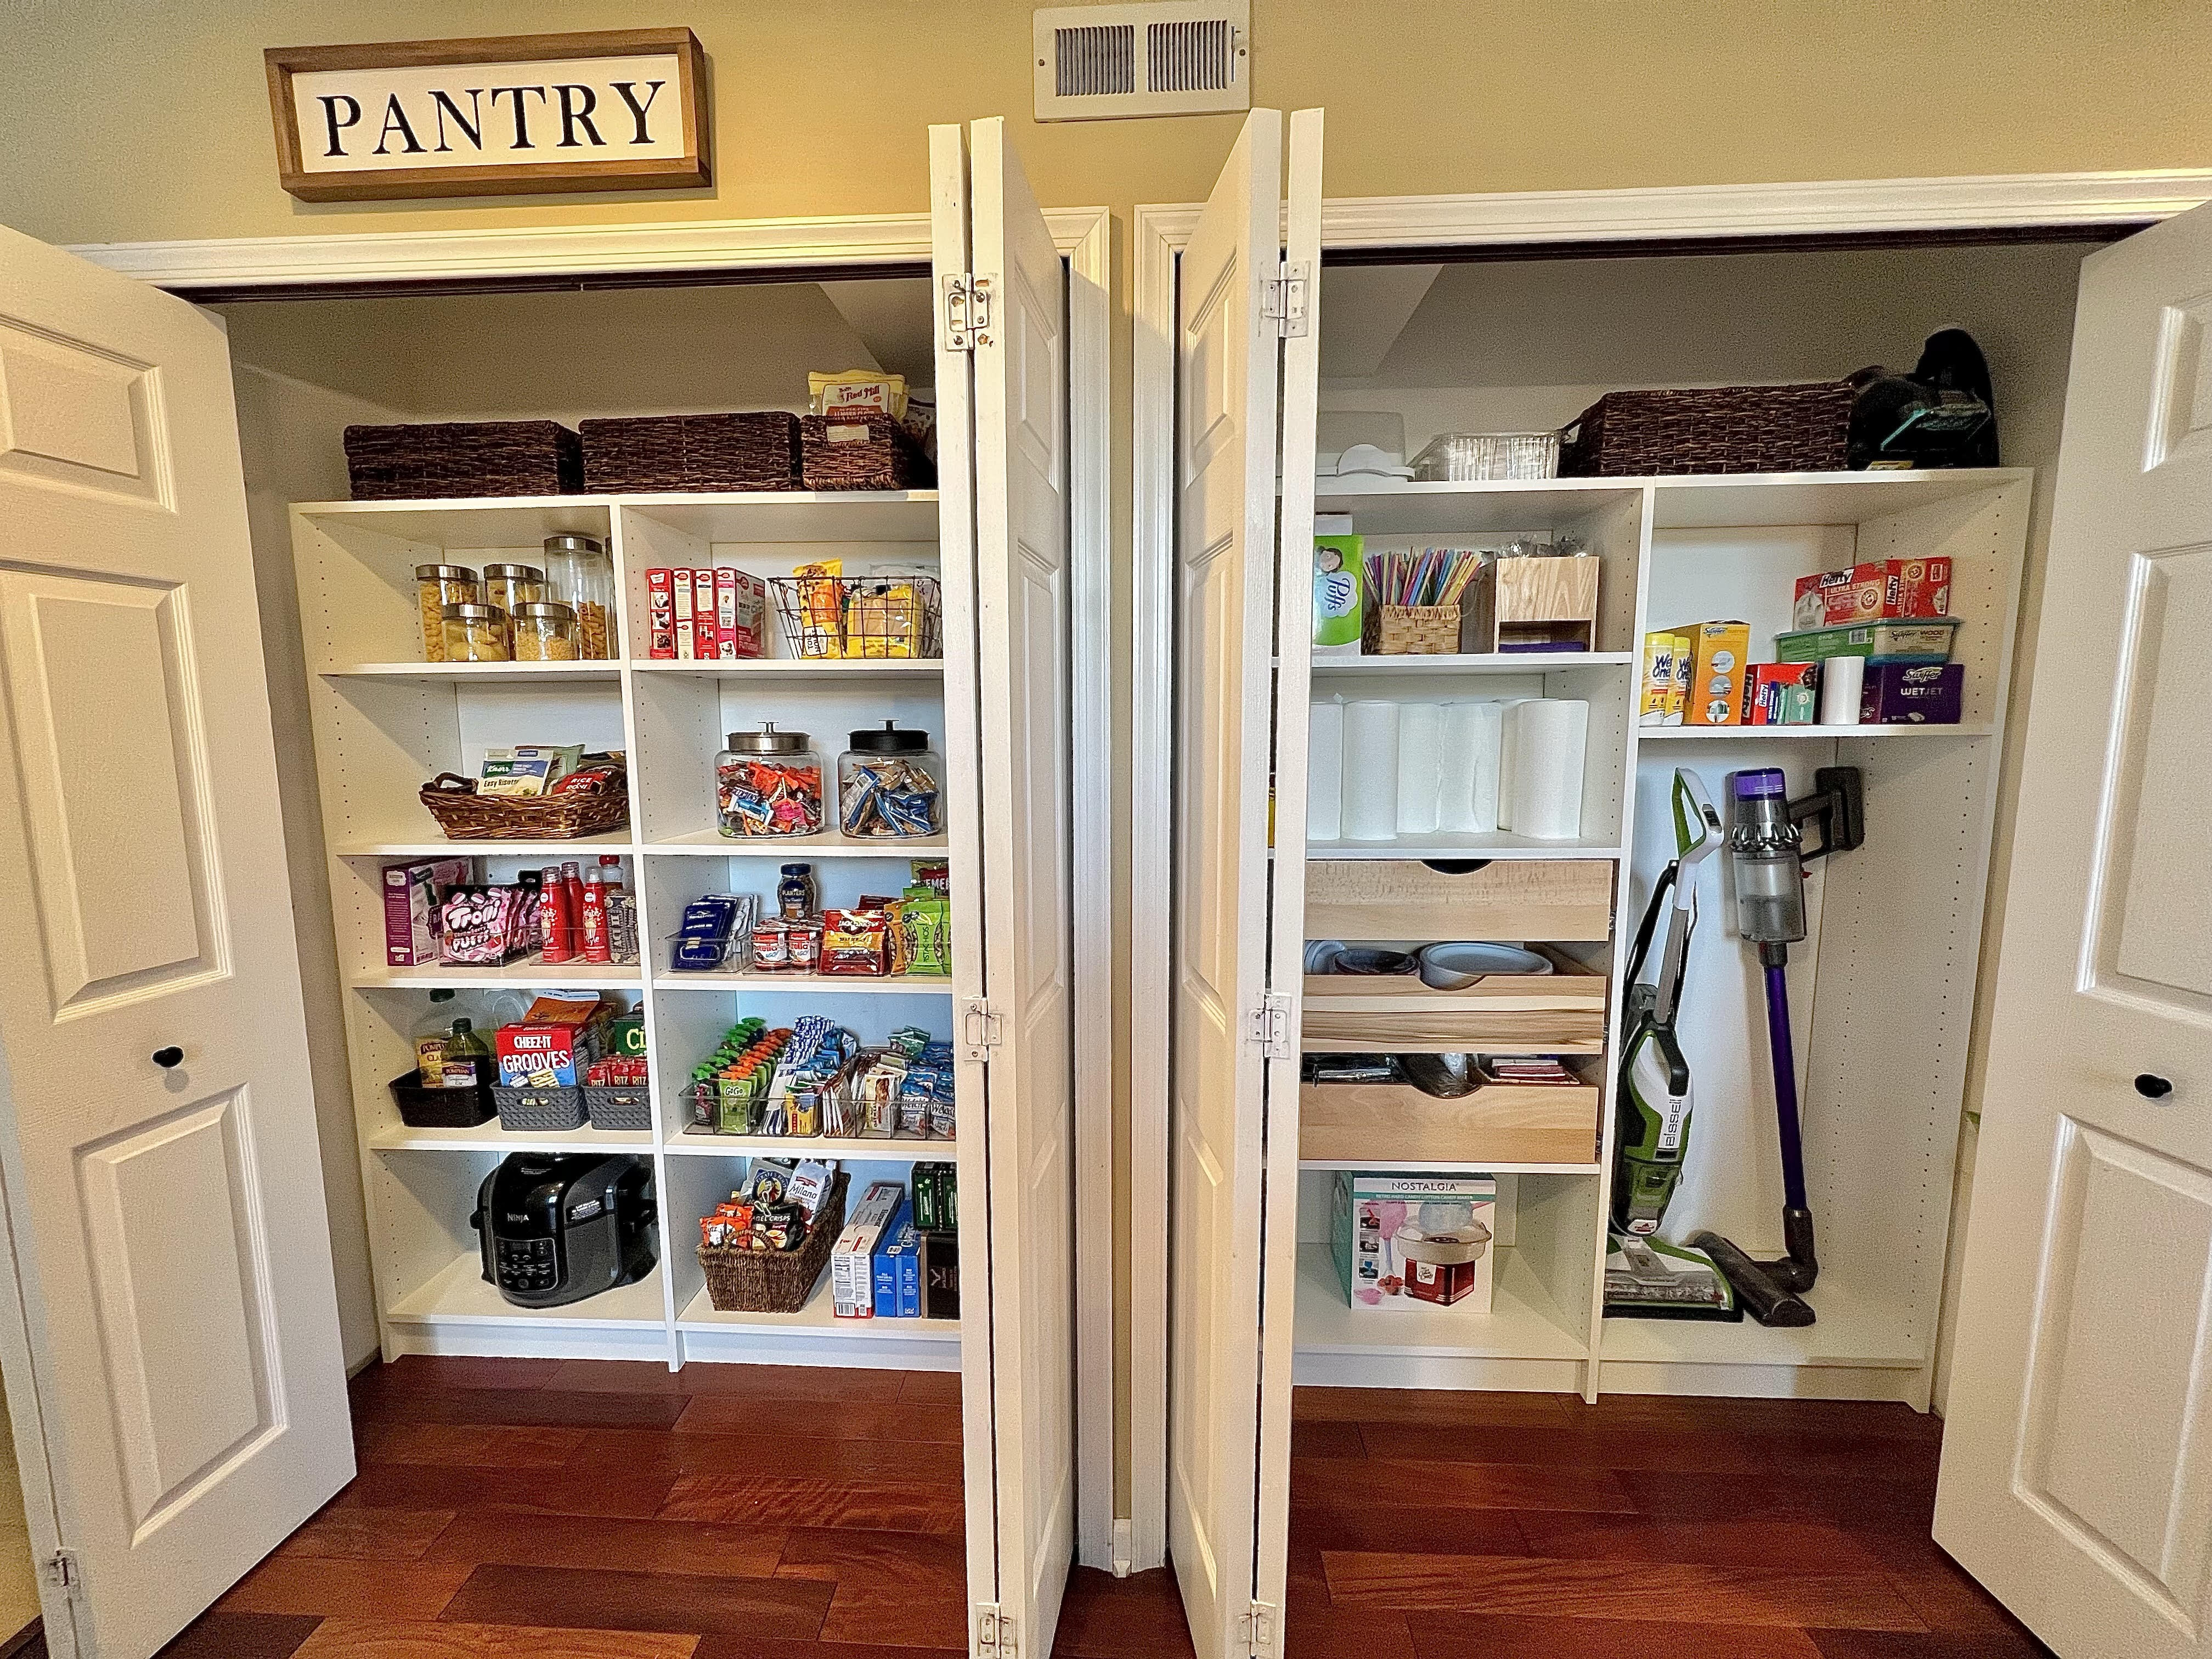
Revamping and reorganizing any space can feel a little overwhelming, but it’s oh so satisfying once it’s done. And your kitchen pantry is one of those places in the house that just seems to accumulate clutter and detritus over the years. Opening that door and deciding to tackle a little DIY organization is definitely daunting, but we’ve got a solution for you! Easy Closets helps you transform your space with minimal time and effort. Kristy redid her kitchen pantry using an Easy Closets system and it was life changing! AND – right now you can get 10% off your order with our exclusive code KRISTY10 *valid through 11/21! See Kristy’s pantry transformation below.

There’s nothing I love more than organization. With my pantry needing all the help it could get, I was desperate to find a simple, manageable solution without going broke. And then I stumbled across this Easy Closets system. The name says it all…it was EASY to put together! Going from the before (bottom) to the after (top) was actually a seamless process and only took me two days to complete!!

This is my pantry before…yikes. I started the redo by measuring my space. Once I submitted my measurements, Easy Closets put together a plan for my pantry (request a free design plan here)! They send you a specially tailored layout that you can then choose to love, modify, or switch out for a completely different plan! You can do this as many times as you want until you find the perfect layout for your space and your needs. The representatives at Easy Closets made the planning part painless for me and helped transform my space with ease! You can also browse their design gallery here. They design pantries, closets, laundry room and garage storage, and more!

Step one: clear out the pantry and take out the old shelving units. This was the worst part – ugh those wire racks. Make sure to take all trim off if you have it. This will allow the new shelves to lay flat on the wall when you install them!

With all of the old shelving out, it was time to install my new Easy Closets system!!

The installation was super simple and it didn’t take me long at all! I couldn’t believe how much of a difference it made to have separate shelves and cubbies. I was actually excited to reorganize and put everything away in its new place!

Look at all of that organization!! It’s so much cleaner and less cluttered. A neat freak’s dream come true!

I can see everything in my pantry with ease and know with just a glance what I need to stock up on or what I have enough of. This may not sound like a huge deal but knowing exactly what I need helps cut down on multiple weekly trips to the grocery store! And anything that can save a little time and make life a little easier is a huge blessing.

Even my paper products and cleaning supplies are neat and organized now! The pullout drawers are great for storing things like aluminum foil, parchment paper, and Ziploc bags, or items I don’t use every day like baking supplies and party goods.

And just like that I have a brand new, beautiful pantry. I seriously love just looking at it, and the fact that it was so easy to transform makes it that much more enjoyable!! No matter how big or small your space is, Easy Closets has you covered!
**DON’T FORGET: Get 10% off your order with our exclusive code KRISTY10 valid through 11/21!
Revamping and reorganizing any space can feel a little overwhelming, but it’s oh so satisfying once it’s done. And your kitchen pantry is one of those places in the house that just seems to accumulate clutter and detritus over the years. Opening that door and deciding to tackle a little DIY organization is definitely daunting, but we’ve got a solution for you! Easy Closets helps you transform your space with minimal time and effort. Kristy redid her kitchen pantry using an Easy Closets system and it was life changing! AND – right now you can get 10% off your order with our exclusive code KRISTY10 *valid through 11/21! See Kristy’s pantry transformation below.
There’s nothing I love more than organization. With my pantry needing all the help it could get, I was desperate to find a simple, manageable solution without going broke. And then I stumbled across this Easy Closets system. The name says it all…it was EASY to put together! Going from the before (bottom) to the after (top) was actually a seamless process and only took me two days to complete!!
This is my pantry before…yikes. I started the redo by measuring my space. Once I submitted my measurements, Easy Closets put together a plan for my pantry (request a free design plan here)! They send you a specially tailored layout that you can then choose to love, modify, or switch out for a completely different plan! You can do this as many times as you want until you find the perfect layout for your space and your needs. The representatives at Easy Closets made the planning part painless for me and helped transform my space with ease! You can also browse their design gallery here. They design pantries, closets, laundry room and garage storage, and more!
Step one: clear out the pantry and take out the old shelving units. This was the worst part – ugh those wire racks. Make sure to take all trim off if you have it. This will allow the new shelves to lay flat on the wall when you install them!
With all of the old shelving out, it was time to install my new Easy Closets system!!
The installation was super simple and it didn’t take me long at all! I couldn’t believe how much of a difference it made to have separate shelves and cubbies. I was actually excited to reorganize and put everything away in its new place!
Look at all of that organization!! It’s so much cleaner and less cluttered. A neat freak’s dream come true!
I can see everything in my pantry with ease and know with just a glance what I need to stock up on or what I have enough of. This may not sound like a huge deal but knowing exactly what I need helps cut down on multiple weekly trips to the grocery store! And anything that can save a little time and make life a little easier is a huge blessing.
Even my paper products and cleaning supplies are neat and organized now! The pullout drawers are great for storing things like aluminum foil, parchment paper, and Ziploc bags, or items I don’t use every day like baking supplies and party goods.
And just like that I have a brand new, beautiful pantry. I seriously love just looking at it, and the fact that it was so easy to transform makes it that much more enjoyable!! No matter how big or small your space is, Easy Closets has you covered!
**DON’T FORGET: Get 10% off your order with our exclusive code KRISTY10 valid through 11/21!
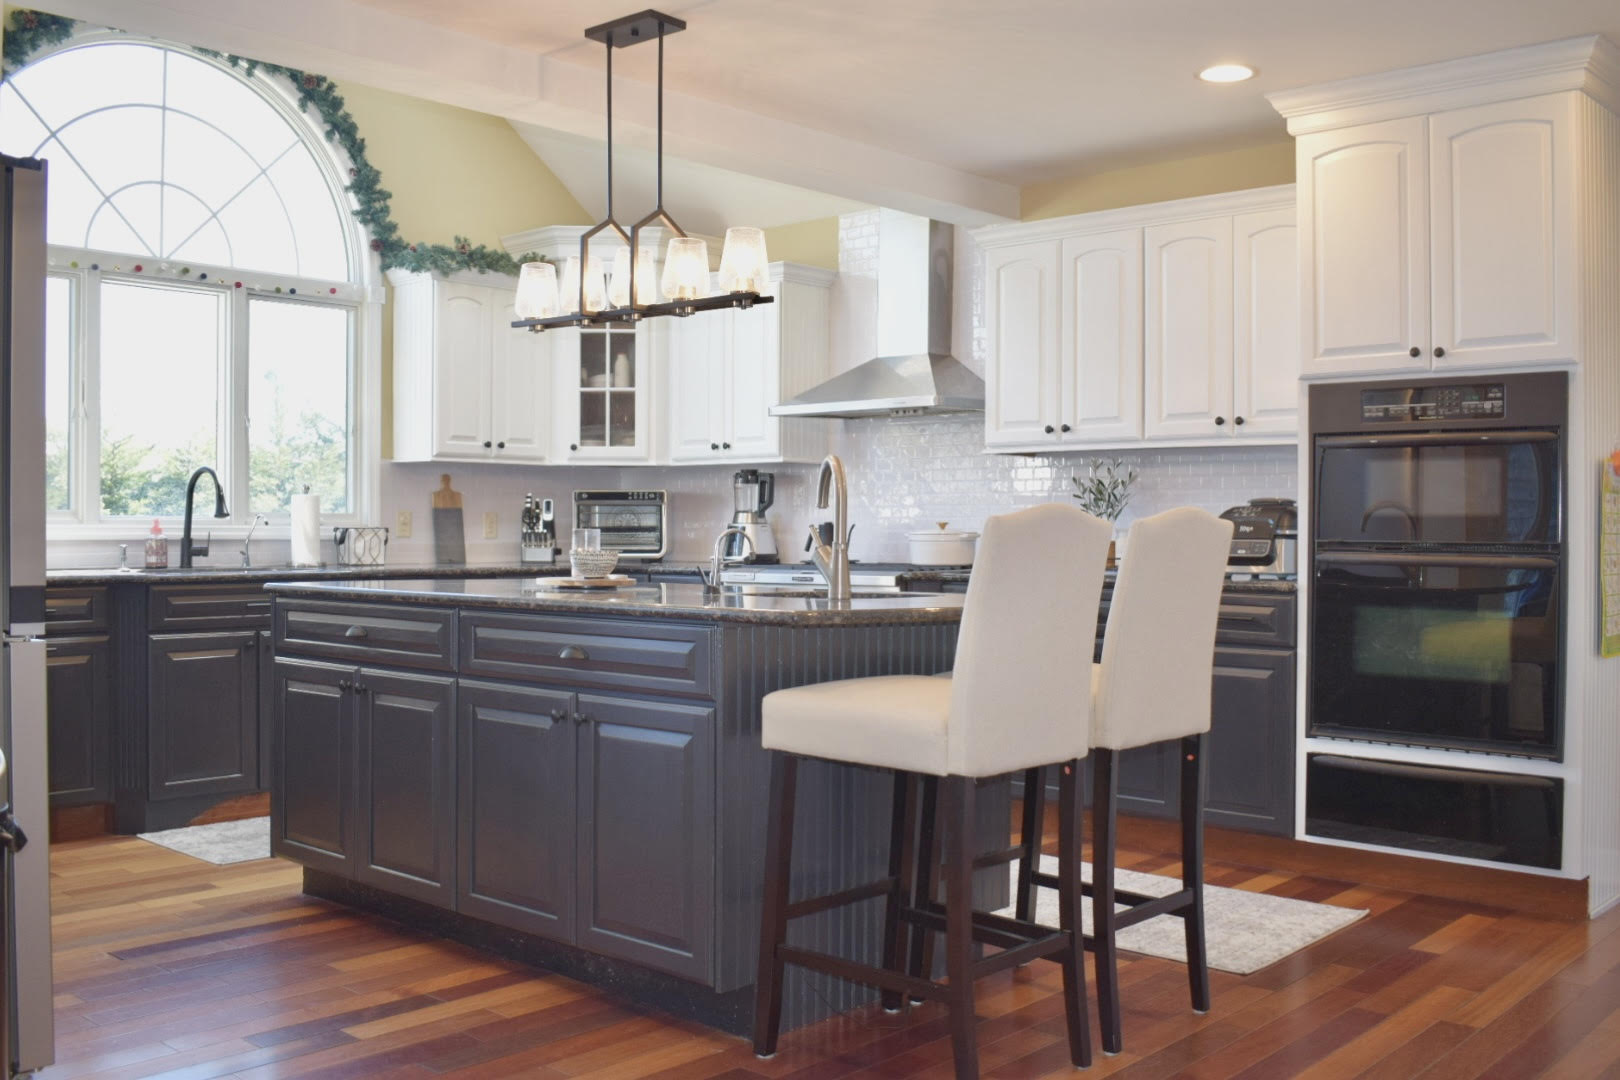
The kitchen is the heart of the house. It’s the command center where family and friends gather all throughout the day and where meals and memories are made. With all the time spent in the kitchen, you want it to be someplace that is clean yet inviting, and a space that feels like home. If your current kitchen isn’t exactly your dream kitchen, sprucing it up is a project that you can do on your own, for less money than you may think! Kristy took her kitchen from a classic okay to a bright, contemporary NO WAY!!! Check out her DIY kitchen redo.

Talk about a transformation!! Wanna know exactly how this happened? Read Kristy’s remodel process from her point of view below.
Before


Taking on this kitchen redo is something I’ve wanted to do for a while now, but to say I second-guessed this project on multiple occasions would be an understatement. I tried to talk myself out of it so many times because I was afraid to really mess something up…I mean this kitchen is the MAIN reason I wanted this home, and I didn’t want to ruin it!! But I did my research (hours and hours of it!) and really tried to mentally prepare myself for what I was getting into. It was definitely a little stressful, but I just kept envisioning the final product and how much happier I would be with my gorgeous new kitchen!! To be completely honest, this is what got me through this project, but I am so thrilled with the end result that all of the worrying was well worth it!
During

The first step was to pick out paint, and my goodness the options are endless! How is it even possible that there are about 45 different shades of black?! After much deliberation and votes cast by family and friends, I finally settled on Benjamin Moore Onyx – I wanted a sleek color that would complement the stainless-steel appliances and new black hardware for the cabinets (more on this later). I kept going back and forth on whether I wanted to do a complete one-color kitchen or if I wanted to go with a two-tone look, but after many many many internet searches, the two-tone is what I kept gravitating towards. Something about the contrast of colors really caught my eye.

After I grabbed all of my supplies, I started the leg work. I wiped all of the cabinets down with warm water and soap (I used Dawn Power Wash). I had a lot of those rubber door stoppers that had melted all over my cabinets (from the previous homeowner) and it took a lot of elbow grease to get all of that off…I may have cried multiple times just over this alone!! Once my cabinets were clean and dry, I checked them for cracks and rough surfaces. Fortunately, I have some really great wood cabinets that didn’t need any sanding. I highly recommend taking the cabinet doors off for easy painting, but if you’re afraid of stripping the screw holes, use a very small paint brush to get behind the doors (where they open and close).


Now it was time to paint!! Well, primer first, of course. I did two coats of this because I have darker cabinets and I wanted the paint to cover fully. I worked in sections because I have a 5-year-old and 3-year-old, so completely closing off my kitchen was definitely not an option. This ended up being a good thing, though, because I could see how the kitchen was coming together piece by piece, and this gave me the motivation to push through when I felt like giving up!

I waited 24 hours between priming and painting to ensure that the primer was completely dry. For the top cabinets, I used INSL-X Cabinet Coat Enamel in Satin because I didn’t want a glossy finish (but you can use a gloss if you like that look!). I did 2-3 coats of this, and I opted for using a paintbrush the entire time – I tried a roller but it just didn’t paint the way I wanted it to, and I didn’t like how it was drying. It definitely took longer this way, but I’m glad that I did it because it looks so much nicer…totally worth the extra bit of effort! The bottom cabinets are the Benjamin Moore Onyx, and I also did 2-3 coats of this.


In between drying time, I worked on my backsplash. I knew it wasn’t in my budget to redo the entire thing with tile, so I went with peel-and-stick subway tile (I used this in my DIY bathroom remodel, and it has held up so well that I knew I wanted to use the same brand for my kitchen). I would have loved to do the backsplash with real tile, but this semipermanent solution is a great substitute and I seriously love it so much!! Plus, it’s way less expensive and that’s always a win.
I highly recommend grabbing these tools to help cut and smooth out your backsplash (these were a lifesaver for me). I used about seven and a half of the tile sheets for my entire kitchen/desk area. *Tip: have patience and work slowly – this stuff is sticky and will adhere to most surfaces pretty easily, so if you mess up and you’re working on paint/sheetrock surfaces it will rip the area. However, if you’re covering it up anyway, it’s not a big deal…you’ll just lose some peel-and-stick along the way.
Prior to peeling the back off, I made sure to measure the pieces. I simply put the backsplash up against the surface I was working on and used my cutting tool to make slits where I needed to cut. Working around electrical outlets was a little tricky, but I found it easier to cut a hole in the peel-and-stick where the outlet would be instead of cutting individual pieces of peel-and-stick to place around the outlet. Once the peel-and-stick was on I used the smoother to get rid of any air bubbles.
After


And just like that, a brand-new kitchen! Okay well, it was definitely a long month of paint strokes and sore body parts, but it was worth every minute of work that I put into it!! I feel as if I live in a completely different home and every person who has stepped foot in my kitchen since the remodel has said it is so much brighter and looks way bigger. The darker color on my bottom cabinets has really brought out my wood floors and dark granite countertops, and this transformation has given me a new-found appreciation for them, too. I’ve wished for so long that I had different floors and white granite countertops, but this new look really flows well and I couldn’t be happier.

As an FYI, I have not done any sealant on the cabinets (I was told the paint I used would resist water and can be easily cleaned without damage). I can say that it’s been a few weeks and I have already cleaned milk, juice, and water off of these doors MULTIPLE times (again, kids) and they have not been affected at all. Benjamin Moore paint is meant for cabinets without any top coat – at least that’s what I’ve been told!

I previously had silver knobs and pull handles but I figured if was redoing everything, it was going to be everything. I found some great pulls and knobs (and these handles for my island) on Amazon, but you can go to your local Home Depot, Lowes, or any hardware store to find new cabinet hardware. *Tip: make sure you measure out your old fixtures before purchasing new ones…I had no idea I had two different sizes with my island drawer handles and my drawer handles throughout the kitchen. Beginner’s mistake!

I wanted to add a couple of kitchen rugs that would soften the space and help tie the floors into the cabinet and countertop color scheme. I went with this gray and white patterned runner because it matched perfectly but would also hide dirt and spills pretty easily. I got a smaller matching one for in front of the sink, too.

One of my favorite things in my new kitchen is this cute little coffee station. There used to be a roll-down door here (it’s in one of the photos above) and I kept seldom-used appliances in here, but I decided to remove the door and make it into a mini cafe! My morning cup of coffee is even more enjoyable now that I get to make it here.

If you think that you can’t do this or that you don’t have what it takes – take the leap of faith!! There may be some tears (happy, sad, and frustrated) and definitely a few bad words, but the finished product will bring you so much joy and relief it will all be worth it. And if I can do it with two toddlers and zero knowledge of doing something like this, you DEFINITELY can do it.
And if you’re looking for more remodeling inspiration, check out this DIY bathroom makeover and this modern farmhouse living room redo!
Thanks for reading!! Let us know what you think of this amazing transformation xo.
The kitchen is the heart of the house. It’s the command center where family and friends gather all throughout the day and where meals and memories are made. With all the time spent in the kitchen, you want it to be someplace that is clean yet inviting, and a space that feels like home. If your current kitchen isn’t exactly your dream kitchen, sprucing it up is a project that you can do on your own, for less money than you may think! Kristy took her kitchen from a classic okay to a bright, contemporary NO WAY!!! Check out her DIY kitchen redo.
Talk about a transformation!! Wanna know exactly how this happened? Read Kristy’s remodel process from her point of view below.
Before
Taking on this kitchen redo is something I’ve wanted to do for a while now, but to say I second-guessed this project on multiple occasions would be an understatement. I tried to talk myself out of it so many times because I was afraid to really mess something up…I mean this kitchen is the MAIN reason I wanted this home, and I didn’t want to ruin it!! But I did my research (hours and hours of it!) and really tried to mentally prepare myself for what I was getting into. It was definitely a little stressful, but I just kept envisioning the final product and how much happier I would be with my gorgeous new kitchen!! To be completely honest, this is what got me through this project, but I am so thrilled with the end result that all of the worrying was well worth it!
During
The first step was to pick out paint, and my goodness the options are endless! How is it even possible that there are about 45 different shades of black?! After much deliberation and votes cast by family and friends, I finally settled on Benjamin Moore Onyx – I wanted a sleek color that would complement the stainless-steel appliances and new black hardware for the cabinets (more on this later). I kept going back and forth on whether I wanted to do a complete one-color kitchen or if I wanted to go with a two-tone look, but after many many many internet searches, the two-tone is what I kept gravitating towards. Something about the contrast of colors really caught my eye.
After I grabbed all of my supplies, I started the leg work. I wiped all of the cabinets down with warm water and soap (I used Dawn Power Wash). I had a lot of those rubber door stoppers that had melted all over my cabinets (from the previous homeowner) and it took a lot of elbow grease to get all of that off…I may have cried multiple times just over this alone!! Once my cabinets were clean and dry, I checked them for cracks and rough surfaces. Fortunately, I have some really great wood cabinets that didn’t need any sanding. I highly recommend taking the cabinet doors off for easy painting, but if you’re afraid of stripping the screw holes, use a very small paint brush to get behind the doors (where they open and close).
Now it was time to paint!! Well, primer first, of course. I did two coats of this because I have darker cabinets and I wanted the paint to cover fully. I worked in sections because I have a 5-year-old and 3-year-old, so completely closing off my kitchen was definitely not an option. This ended up being a good thing, though, because I could see how the kitchen was coming together piece by piece, and this gave me the motivation to push through when I felt like giving up!
I waited 24 hours between priming and painting to ensure that the primer was completely dry. For the top cabinets, I used INSL-X Cabinet Coat Enamel in Satin because I didn’t want a glossy finish (but you can use a gloss if you like that look!). I did 2-3 coats of this, and I opted for using a paintbrush the entire time – I tried a roller but it just didn’t paint the way I wanted it to, and I didn’t like how it was drying. It definitely took longer this way, but I’m glad that I did it because it looks so much nicer…totally worth the extra bit of effort! The bottom cabinets are the Benjamin Moore Onyx, and I also did 2-3 coats of this.
In between drying time, I worked on my backsplash. I knew it wasn’t in my budget to redo the entire thing with tile, so I went with peel-and-stick subway tile (I used this in my DIY bathroom remodel, and it has held up so well that I knew I wanted to use the same brand for my kitchen). I would have loved to do the backsplash with real tile, but this semipermanent solution is a great substitute and I seriously love it so much!! Plus, it’s way less expensive and that’s always a win.
I highly recommend grabbing these tools to help cut and smooth out your backsplash (these were a lifesaver for me). I used about seven and a half of the tile sheets for my entire kitchen/desk area. *Tip: have patience and work slowly – this stuff is sticky and will adhere to most surfaces pretty easily, so if you mess up and you’re working on paint/sheetrock surfaces it will rip the area. However, if you’re covering it up anyway, it’s not a big deal…you’ll just lose some peel-and-stick along the way.
Prior to peeling the back off, I made sure to measure the pieces. I simply put the backsplash up against the surface I was working on and used my cutting tool to make slits where I needed to cut. Working around electrical outlets was a little tricky, but I found it easier to cut a hole in the peel-and-stick where the outlet would be instead of cutting individual pieces of peel-and-stick to place around the outlet. Once the peel-and-stick was on I used the smoother to get rid of any air bubbles.
After
And just like that, a brand-new kitchen! Okay well, it was definitely a long month of paint strokes and sore body parts, but it was worth every minute of work that I put into it!! I feel as if I live in a completely different home and every person who has stepped foot in my kitchen since the remodel has said it is so much brighter and looks way bigger. The darker color on my bottom cabinets has really brought out my wood floors and dark granite countertops, and this transformation has given me a new-found appreciation for them, too. I’ve wished for so long that I had different floors and white granite countertops, but this new look really flows well and I couldn’t be happier.
As an FYI, I have not done any sealant on the cabinets (I was told the paint I used would resist water and can be easily cleaned without damage). I can say that it’s been a few weeks and I have already cleaned milk, juice, and water off of these doors MULTIPLE times (again, kids) and they have not been affected at all. Benjamin Moore paint is meant for cabinets without any top coat – at least that’s what I’ve been told!
I previously had silver knobs and pull handles but I figured if was redoing everything, it was going to be everything. I found some great pulls and knobs (and these handles for my island) on Amazon, but you can go to your local Home Depot, Lowes, or any hardware store to find new cabinet hardware. *Tip: make sure you measure out your old fixtures before purchasing new ones…I had no idea I had two different sizes with my island drawer handles and my drawer handles throughout the kitchen. Beginner’s mistake!
I wanted to add a couple of kitchen rugs that would soften the space and help tie the floors into the cabinet and countertop color scheme. I went with this gray and white patterned runner because it matched perfectly but would also hide dirt and spills pretty easily. I got a smaller matching one for in front of the sink, too.
One of my favorite things in my new kitchen is this cute little coffee station. There used to be a roll-down door here (it’s in one of the photos above) and I kept seldom-used appliances in here, but I decided to remove the door and make it into a mini cafe! My morning cup of coffee is even more enjoyable now that I get to make it here.
If you think that you can’t do this or that you don’t have what it takes – take the leap of faith!! There may be some tears (happy, sad, and frustrated) and definitely a few bad words, but the finished product will bring you so much joy and relief it will all be worth it. And if I can do it with two toddlers and zero knowledge of doing something like this, you DEFINITELY can do it.
And if you’re looking for more remodeling inspiration, check out this DIY bathroom makeover and this modern farmhouse living room redo!
Thanks for reading!! Let us know what you think of this amazing transformation xo.
A fall wreath is a simple way to add a touch of autumn to any area of your home. Most commonly used to adorn a front door, wreaths can also be hung inside to bring the rustic outdoors into your home. Think of hanging one above a mantle or an entryway table, or used as a table centerpiece to hold a collection of candles or other fall decorations. See these pretty artificial autumn wreaths from Walmart below.

Reds, yellows, oranges, and browns make a wreath fabulous for fall. Berries, pumpkins, sunflowers, and maple leaves are great autumn accessories and add dimension and personality to any wreath. Get one with LED lights to add warmth, or opt for a fun Halloween one to up your spooky decor game.
Shop the Wreaths


Want to get crafty? Try making your own artificial fall wreath! Use the above ones for some inspiration, or let yourself get creative. All you need is a wreath form, some tulle, ribbon, garland, and a few artificial accessories.

A fall wreath is a simple way to add a touch of autumn to any area of your home. Most commonly used to adorn a front door, wreaths can also be hung inside to bring the rustic outdoors into your home. Think of hanging one above a mantle or an entryway table, or used as a table centerpiece to hold a collection of candles or other fall decorations. See these pretty artificial autumn wreaths from Walmart below.
Reds, yellows, oranges, and browns make a wreath fabulous for fall. Berries, pumpkins, sunflowers, and maple leaves are great autumn accessories and add dimension and personality to any wreath. Get one with LED lights to add warmth, or opt for a fun Halloween one to up your spooky decor game.
Shop the Wreaths
Want to get crafty? Try making your own artificial fall wreath! Use the above ones for some inspiration, or let yourself get creative. All you need is a wreath form, some tulle, ribbon, garland, and a few artificial accessories.
Get ready to deck out your home with all things spooky this Halloween season…without spending a lot of money! DIY Halloween decorations are easy to make and super inexpensive. Dollar Tree has SO many great decor ideas and the supplies you need to make them!! See some of our favorite projects below along with step-by-step instructions.
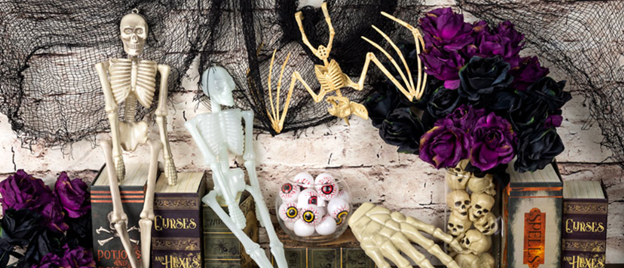
Halloween Mantel

Transform your fireplace for Halloween by dressing up your mantel! Use a spooktacular variety of Halloween decorations, garlands, candles, and figurines to really make it your own. Keep it clean and modern with neutral pumpkins and candles, or get seriously spooky with skeletons, spiders, and spider webs. If you like more of a haunted feel, use potion bottles, tombstones, and flickering fairy lights.
What You’ll Need:
- Pumpkins
- Spooky Figurines
- LED String Lights
- Faux Spider Webs
- Tombstones
- Skeletons
- Garland
- Banners
- Candles
- Candleholders
Step-by-Step Directions:
- Have fun with this creation! Layer a variety of spooky elements together to create the ultimate display. Use candles, figurines, garlands, banners, spiders web, and more to make your own look
- Enjoy the Halloween ambiance at the centerpiece of your mantel all month long!
Studded & Glittered Pumpkins

Make your own sophisticated and expensive-looking decorations for just a couple of dollars! Paint a pumpkin (real or foam) black, white, or a metallic color and use a little glue, glitter, and imagination to give them a chic and edgy look.
What You’ll Need:
Step-by-Step Directions:
- Draw swirling designs or trace the natural indentations on your pumpkin with craft glue and sprinkle on glitter. When dry, brush off the loose glitter.
- Dip thumbtacks in glue, then in the color glitter of your choice (or, if you prefer, leave the tacks their original color). Let them dry, then push into foam or real pumpkins for a studded look.
- Spread glue on the entire pumpkin and glitz it out with glitter for a super-glam look.
Spooky Crystal Ball Candlesticks

Create your own creepy crystal ball candlesticks in just a few simple steps. Choose some spooky photos to put inside your “crystal balls” and use these candlesticks as a table centerpiece or mantel accents.
What You’ll Need:
- Glass Taper Candleholders
- Clear Plastic Ornaments
- Black and White “Creepy” Photos
- Scissors
- Hot Glue Gun
- Hot Glue Sticks
Step-by-Step Directions:
- Gather your supplies.
- Use scissors to cut the black and white photographs in a circle shape and size to fit the ornaments.
- Open the ornament, splitting in half. Insert the photograph into the ornament and close.
- Apply glue at the top of the candleholder and press the ornament into the glue.
- Place your crystal ball at the center of a party table or casually on a side table for a creepy effect!
Creepy Candles

These creepy candles on a silver platter are the perfect place for displaying Halloween cards or storing candy. Add scary figurines to make these candles frighteningly fun or a Halloween greeting sign to complete the look.
What You’ll Need:
- 2-pk. LED Tealight Candles
- 1 Orange Pool Noodle
- 1 Black Pool Noodle
- 1 Creepy Cloth
- 1 Silver Look Plastic Catering Tray
- 1 Hot Glue Gun
- Hot Glue Sticks
- Serrated or Electric Kitchen Knife
Step-by-Step Directions:
- Carefully cut black and orange pool noodles into various lengths between 4″ and 10″.
- Using the knife, hollow out about an inch of the middle of each length of noodle so that the LED tealight will fit securely inside. Don’t glue the candles into the pool noodles – you’ll want to be able to switch them on and off.
- Glue the bottom of each pool noodle to the tray in the arrangement you desire, then turn on the candles. Finally, drape the creepy cloth over the candles, cutting into a smaller size if needed.
Giant Lollipops

These giant lollipops are a sweet addition to your Halloween decor! Great for the garden or trunk-or-treat decorations, these are easy to make and fun to display.
What You’ll Need:
- 2 Orange Pool Noodles
- 1 Pink Pool Noodle
- 1 Purple Pool Noodle
- 2 Bamboo Skewers or Wood Dowels
- 2-pk. Basket Bags
- 1 Roll Halloween Ribbon or Deco Mesh
- 1 Hot Glue Gun
- Hot Glue Sticks
- Serrated or Electric Kitchen Knife
Step-by-Step Directions:
- Carefully cut all pool noodles in half lengthwise.
- Match different colors of half-noodles together (i.e., pink and purple, orange and purple). Use different lengths to create different sized lollipops.
- Gently roll the pieces up together and, for best results, leave curled up overnight before gluing to help keep their shape! A good trick is to wedge the coil between a table and a heavy chair to “set” overnight.
- In the morning, use hot glue to attach the halves together, then glue them back into a roll.
- Poke a wood dowel or skewer into the middle of each coil to secure, and wedge them again to let the glue dry for at least 15 minutes.
- Cover the “lollipops” in clear basket bags and secure the ends of the bags with the twist ties provided.
- Add a bow or ribbon to the base of each lollipop.
Want more decor for spooky season?? Shop all Halloween decorations and all Halloween crafting supplies from Dollar Tree. **get free shipping by having your order shipped to your nearest Dollar Tree and pick it up there!
Get ready to deck out your home with all things spooky this Halloween season…without spending a lot of money! DIY Halloween decorations are easy to make and super inexpensive. Dollar Tree has SO many great decor ideas and the supplies you need to make them!! See some of our favorite projects below along with step-by-step instructions.
Halloween Mantel
Transform your fireplace for Halloween by dressing up your mantel! Use a spooktacular variety of Halloween decorations, garlands, candles, and figurines to really make it your own. Keep it clean and modern with neutral pumpkins and candles, or get seriously spooky with skeletons, spiders, and spider webs. If you like more of a haunted feel, use potion bottles, tombstones, and flickering fairy lights.
What You’ll Need:
- Pumpkins
- Spooky Figurines
- LED String Lights
- Faux Spider Webs
- Tombstones
- Skeletons
- Garland
- Banners
- Candles
- Candleholders
Step-by-Step Directions:
- Have fun with this creation! Layer a variety of spooky elements together to create the ultimate display. Use candles, figurines, garlands, banners, spiders web, and more to make your own look
- Enjoy the Halloween ambiance at the centerpiece of your mantel all month long!
Studded & Glittered Pumpkins
Make your own sophisticated and expensive-looking decorations for just a couple of dollars! Paint a pumpkin (real or foam) black, white, or a metallic color and use a little glue, glitter, and imagination to give them a chic and edgy look.
What You’ll Need:
Step-by-Step Directions:
- Draw swirling designs or trace the natural indentations on your pumpkin with craft glue and sprinkle on glitter. When dry, brush off the loose glitter.
- Dip thumbtacks in glue, then in the color glitter of your choice (or, if you prefer, leave the tacks their original color). Let them dry, then push into foam or real pumpkins for a studded look.
- Spread glue on the entire pumpkin and glitz it out with glitter for a super-glam look.
Spooky Crystal Ball Candlesticks
Create your own creepy crystal ball candlesticks in just a few simple steps. Choose some spooky photos to put inside your “crystal balls” and use these candlesticks as a table centerpiece or mantel accents.
What You’ll Need:
- Glass Taper Candleholders
- Clear Plastic Ornaments
- Black and White “Creepy” Photos
- Scissors
- Hot Glue Gun
- Hot Glue Sticks
Step-by-Step Directions:
- Gather your supplies.
- Use scissors to cut the black and white photographs in a circle shape and size to fit the ornaments.
- Open the ornament, splitting in half. Insert the photograph into the ornament and close.
- Apply glue at the top of the candleholder and press the ornament into the glue.
- Place your crystal ball at the center of a party table or casually on a side table for a creepy effect!
Creepy Candles
These creepy candles on a silver platter are the perfect place for displaying Halloween cards or storing candy. Add scary figurines to make these candles frighteningly fun or a Halloween greeting sign to complete the look.
What You’ll Need:
- 2-pk. LED Tealight Candles
- 1 Orange Pool Noodle
- 1 Black Pool Noodle
- 1 Creepy Cloth
- 1 Silver Look Plastic Catering Tray
- 1 Hot Glue Gun
- Hot Glue Sticks
- Serrated or Electric Kitchen Knife
Step-by-Step Directions:
- Carefully cut black and orange pool noodles into various lengths between 4″ and 10″.
- Using the knife, hollow out about an inch of the middle of each length of noodle so that the LED tealight will fit securely inside. Don’t glue the candles into the pool noodles – you’ll want to be able to switch them on and off.
- Glue the bottom of each pool noodle to the tray in the arrangement you desire, then turn on the candles. Finally, drape the creepy cloth over the candles, cutting into a smaller size if needed.
Giant Lollipops
These giant lollipops are a sweet addition to your Halloween decor! Great for the garden or trunk-or-treat decorations, these are easy to make and fun to display.
What You’ll Need:
- 2 Orange Pool Noodles
- 1 Pink Pool Noodle
- 1 Purple Pool Noodle
- 2 Bamboo Skewers or Wood Dowels
- 2-pk. Basket Bags
- 1 Roll Halloween Ribbon or Deco Mesh
- 1 Hot Glue Gun
- Hot Glue Sticks
- Serrated or Electric Kitchen Knife
Step-by-Step Directions:
- Carefully cut all pool noodles in half lengthwise.
- Match different colors of half-noodles together (i.e., pink and purple, orange and purple). Use different lengths to create different sized lollipops.
- Gently roll the pieces up together and, for best results, leave curled up overnight before gluing to help keep their shape! A good trick is to wedge the coil between a table and a heavy chair to “set” overnight.
- In the morning, use hot glue to attach the halves together, then glue them back into a roll.
- Poke a wood dowel or skewer into the middle of each coil to secure, and wedge them again to let the glue dry for at least 15 minutes.
- Cover the “lollipops” in clear basket bags and secure the ends of the bags with the twist ties provided.
- Add a bow or ribbon to the base of each lollipop.
Want more decor for spooky season?? Shop all Halloween decorations and all Halloween crafting supplies from Dollar Tree. **get free shipping by having your order shipped to your nearest Dollar Tree and pick it up there!
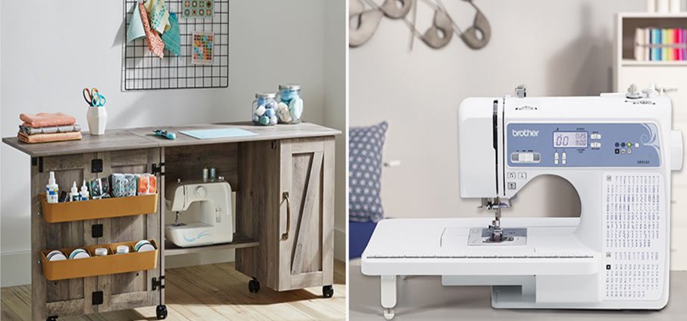
September is National Sewing Month and to celebrate, we’re bringing you fun and frugal ways to spruce up your home with DIY sewing projects. Walmart has all the products you’ll need to get started, plus easy step-by-step instructions and how-to videos to help you! So even if you’re a beginner, you can tackle these projects effortlessly, adding a personal touch to your home decor for way less.

Purple Ikat Ogee Fabric | Solid Purple Fabric | Gray Aztec Fabric | Sewing Machine | Ironing Board | Iron | Thread | Fabric Scissors
These are just a few essentials that you’ll need for pretty much any sewing project, so we recommend having these on hand. Various coordinating fabrics, a sewing machine, an iron and ironing board, multiple colors of thread, and fabric shears will be some of your go-to tools. New to the craft? Check out this sewing machine guide to find out which one is right for you.
How to Sew Curtains

A nice pair of curtains can instantly dress up any room. Making your own is way cheaper than buying them from the store, plus you can customize your curtains to match any room perfectly.
What you’ll need:
Instructions:
- Step 1: Measure for your curtain panels. For floor length curtains, measure from the floor to the top of the installed curtain rod. For this project, you’ll want to add 7 inches to that measurement. Measure the width of your curtains and double that number. Before you mark, cut off selvage edges of the fabric.
- Step 2: Lay out the fabric and mark the length and width measurements that you calculated in step one with a line across the fabric. Repeat this step to create two panels.
- Step 3: Lay out the fabric and mark the length measurement that you calculated in step one with a line across the fabric.
- Step 4: Mark and cut 16 pieces for the tabs (where your curtains will hang from the rod). These pieces should be five inches x five inches.
- Step 5: Mark and cut two strips of fabric that are five inches wide. These will be used for top facings.
- Step 6: Fold two inches on the long sides of each of your curtain panels and press. Unfold, then refold to the pressed line and stitch. Repeat on all four long sides of the panels as well as the short edges of the facing pieces.
- Step 7: Press ½ inch on the long edge of each facing strip.
- Step 8: Fold the tab pieces in half with their right sides together and pine close to the raw edge. Stitch ½-inch seams along the raw edges of each tab. Turn the right sides out and press with the seam centered.
- Step 9: With the right side of the panel up, pin the eight tabs to the top edge of the curtain. Make sure they’re evenly spaced with the seam side of the tab up and the raw edges aligned with each other.
- Step 10: Place the facing piece across the top over the tabs with the right sides together and the raw edges even. Pin in place.
- Step 11: Stitch across the panel at ½ inch through all thicknesses. Turn facing and tabs to the back of the panel and press. Tuck each tab under the facing and pin. Stitch across the panel to secure.
- Step 12: Lay panels out on the surface and remeasure to finish length determined. Mark with a pin on the outer edge of each side panel. Fold to the pins and press in final hem length. Unfold and take remain fabric to meet the pressed fold. Press again and pin. Stitch close to the folded edge to finish.
- Step 13: Hang curtains on the rod, threading the pole through the tabs on the back of each panel.
Watch the “how-to” video here.
How to Sew a Floor Pouf

Floor poufs are an adorable accent, but they can get pretty pricey. This make-your-own version is simple and inexpensive enough that you’ll want one in every room.
What you’ll need:
- Fabric (two yards, ½-yard contrast flange)
- Thread
- Sewing machine
- Ruler
- Pins
- Hand sewing needle
- Scissors
- Iron
- Ironing board
- Poly batting (or other stuffing materials)
Instructions:
- Step 1: Mark and cut four 6–18 inch squares from the main fabric.
- Step 2: Mark and cut strips of fabric 4–2 inches wide (12–36 inches long, depending on what you chose in step 1 for the flange).
- Step 3: Sew the squares together with a two inch seam, stitching on the bias to join.
- Step 4: Trim excess and press open bias seams. Press strip in half carefully matching the raw edges.
- Step 5: Pin flange to outer edges of two squares (top and bottom) with the raw edges matching on the perimeter. Fold three small pleats to pivot around the corners. Start to stitch the perimeter with ½-inch seam. When you get to the end of the flange, overlap to join the start and finish. Repeat on the bottom square.
- Step 6: Stitch the remaining four square right sides together with a ½-inch seam to create the body of the pouf.
- Step 7: Pin top two sides, right sides together, matching four side seams to four corners. Stitch with ½-inch seam, pivoting at each corner. Repeat the process for the bottom leaving an eight-inch opening to turn. Stitch, turn right side out.
- Step 8: Press the flange and side seams.
- Step 9: Fill tightly with poly batting or old recycled linens. Hand stitch the opening closed with a needle and thread.
Watch the “how-to” video here.
How to Sew a Throw Pillow

Decorative throw pillows can really complete the look of a room, but these too can be costly. A DIY cover is a great way to mix and match colors, patterns, and fabrics without breaking the bank!
What you’ll need:
- Fabric
- Thread
- Sewing machine
- Fabric pencil
- Pins
- Fabric scissors
- Pillow insert
- Craft paper for the pattern
- Iron
- Ironing board
Instructions:
- Step 1: Make the pattern for the pillow from craft paper. Make the paper pattern the size of your pillow insert (we chose an 18-inch square).
- Step 2: Trace the pattern onto the wrong side of the fabric. Cut the square. Trace two rectangles for the back (we did an 18 x 12 inch rectangle). Cut out the rectangle.
- Step 3: Press a narrow hem in one long edge of each rectangle and stitch.
- Step 4: Lay the fabric square on the table with the right sides up. Lay two fabric rectangles on top with the right sides down. Match edges with hemmed edges overlapping in the center. Pin the pieces together.
- Step 5: Stitch around the perimeter of the pillow with a ½-inch seam. Trim the corners and turn right side out. Press. Insert the pillow form.
Watch the “how-to” video here.
Thanks for reading! Which of these DIY sewing projects are you ready to try??
September is National Sewing Month and to celebrate, we’re bringing you fun and frugal ways to spruce up your home with DIY sewing projects. Walmart has all the products you’ll need to get started, plus easy step-by-step instructions and how-to videos to help you! So even if you’re a beginner, you can tackle these projects effortlessly, adding a personal touch to your home decor for way less.
Purple Ikat Ogee Fabric | Solid Purple Fabric | Gray Aztec Fabric | Sewing Machine | Ironing Board | Iron | Thread | Fabric Scissors
These are just a few essentials that you’ll need for pretty much any sewing project, so we recommend having these on hand. Various coordinating fabrics, a sewing machine, an iron and ironing board, multiple colors of thread, and fabric shears will be some of your go-to tools. New to the craft? Check out this sewing machine guide to find out which one is right for you.
How to Sew Curtains
A nice pair of curtains can instantly dress up any room. Making your own is way cheaper than buying them from the store, plus you can customize your curtains to match any room perfectly.
What you’ll need:
Instructions:
- Step 1: Measure for your curtain panels. For floor length curtains, measure from the floor to the top of the installed curtain rod. For this project, you’ll want to add 7 inches to that measurement. Measure the width of your curtains and double that number. Before you mark, cut off selvage edges of the fabric.
- Step 2: Lay out the fabric and mark the length and width measurements that you calculated in step one with a line across the fabric. Repeat this step to create two panels.
- Step 3: Lay out the fabric and mark the length measurement that you calculated in step one with a line across the fabric.
- Step 4: Mark and cut 16 pieces for the tabs (where your curtains will hang from the rod). These pieces should be five inches x five inches.
- Step 5: Mark and cut two strips of fabric that are five inches wide. These will be used for top facings.
- Step 6: Fold two inches on the long sides of each of your curtain panels and press. Unfold, then refold to the pressed line and stitch. Repeat on all four long sides of the panels as well as the short edges of the facing pieces.
- Step 7: Press ½ inch on the long edge of each facing strip.
- Step 8: Fold the tab pieces in half with their right sides together and pine close to the raw edge. Stitch ½-inch seams along the raw edges of each tab. Turn the right sides out and press with the seam centered.
- Step 9: With the right side of the panel up, pin the eight tabs to the top edge of the curtain. Make sure they’re evenly spaced with the seam side of the tab up and the raw edges aligned with each other.
- Step 10: Place the facing piece across the top over the tabs with the right sides together and the raw edges even. Pin in place.
- Step 11: Stitch across the panel at ½ inch through all thicknesses. Turn facing and tabs to the back of the panel and press. Tuck each tab under the facing and pin. Stitch across the panel to secure.
- Step 12: Lay panels out on the surface and remeasure to finish length determined. Mark with a pin on the outer edge of each side panel. Fold to the pins and press in final hem length. Unfold and take remain fabric to meet the pressed fold. Press again and pin. Stitch close to the folded edge to finish.
- Step 13: Hang curtains on the rod, threading the pole through the tabs on the back of each panel.
Watch the “how-to” video here.
How to Sew a Floor Pouf
Floor poufs are an adorable accent, but they can get pretty pricey. This make-your-own version is simple and inexpensive enough that you’ll want one in every room.
What you’ll need:
- Fabric (two yards, ½-yard contrast flange)
- Thread
- Sewing machine
- Ruler
- Pins
- Hand sewing needle
- Scissors
- Iron
- Ironing board
- Poly batting (or other stuffing materials)
Instructions:
- Step 1: Mark and cut four 6–18 inch squares from the main fabric.
- Step 2: Mark and cut strips of fabric 4–2 inches wide (12–36 inches long, depending on what you chose in step 1 for the flange).
- Step 3: Sew the squares together with a two inch seam, stitching on the bias to join.
- Step 4: Trim excess and press open bias seams. Press strip in half carefully matching the raw edges.
- Step 5: Pin flange to outer edges of two squares (top and bottom) with the raw edges matching on the perimeter. Fold three small pleats to pivot around the corners. Start to stitch the perimeter with ½-inch seam. When you get to the end of the flange, overlap to join the start and finish. Repeat on the bottom square.
- Step 6: Stitch the remaining four square right sides together with a ½-inch seam to create the body of the pouf.
- Step 7: Pin top two sides, right sides together, matching four side seams to four corners. Stitch with ½-inch seam, pivoting at each corner. Repeat the process for the bottom leaving an eight-inch opening to turn. Stitch, turn right side out.
- Step 8: Press the flange and side seams.
- Step 9: Fill tightly with poly batting or old recycled linens. Hand stitch the opening closed with a needle and thread.
Watch the “how-to” video here.
How to Sew a Throw Pillow
Decorative throw pillows can really complete the look of a room, but these too can be costly. A DIY cover is a great way to mix and match colors, patterns, and fabrics without breaking the bank!
What you’ll need:
- Fabric
- Thread
- Sewing machine
- Fabric pencil
- Pins
- Fabric scissors
- Pillow insert
- Craft paper for the pattern
- Iron
- Ironing board
Instructions:
- Step 1: Make the pattern for the pillow from craft paper. Make the paper pattern the size of your pillow insert (we chose an 18-inch square).
- Step 2: Trace the pattern onto the wrong side of the fabric. Cut the square. Trace two rectangles for the back (we did an 18 x 12 inch rectangle). Cut out the rectangle.
- Step 3: Press a narrow hem in one long edge of each rectangle and stitch.
- Step 4: Lay the fabric square on the table with the right sides up. Lay two fabric rectangles on top with the right sides down. Match edges with hemmed edges overlapping in the center. Pin the pieces together.
- Step 5: Stitch around the perimeter of the pillow with a ½-inch seam. Trim the corners and turn right side out. Press. Insert the pillow form.
Watch the “how-to” video here.
Thanks for reading! Which of these DIY sewing projects are you ready to try??
Happy Monday Frugal & Thrivers!! We have a fun little treat for you all today, courtesy of our F&T queen bee, Kristy. In just two days, and for less than $300 (yes, you read that correctly) she revamped her master bathroom vanity area, taking it from outdated to outstanding. We gave you a little social media teaser of this post, and now finally, the BIG REVEAL. See how our girl did this awesome (and affordable!) renovation below.
The Before

To prepare, Kristy read a bunch of different blogs and watched a ton of YouTube videos to ensure she did this project the right way. She says, “I mean after all, I have to live with this for the rest of my life.” Smart thinking! With a wealth of new knowledge under her belt, and all her tools on hand, she was ready to begin.
The During
During her research, she found that a lot of people suggested sanding the countertop to start, so she did. But after reading the directions of the kit, she realized it wasn’t necessary, and unless you have deep nicks or bubbles on the surface, she agrees it’s a step that can be skipped. However, if you do choose to sand your countertops she recommends using a 150 grit.

Frog taping came next. She taped all the areas around the counter that she wanted to protect, like the walls and toothbrush holder, and removed the outlet cover and all fixtures (these were going to be replaced later).

After taping was done, she used a scraper to get rid of any putty build up and wiped down all surfaces using soap and warm water – she recommends not using any cleaning chemicals.

Now the fun part begins! The DIY countertop kit comes with everything shown in the picture on the right below (all you’ll need is paper plates and those paint pans) and this kit can use this on any countertop space!

White Diamond Countertop Kit | All Countertop Kits
With the countertop sanded, scraped, and wiped clean, it was time to prime. First, Kristy took the sponge brush that came in the kit and worked on the borders and small crevices that she knew the roller couldn’t get to, slowly working in small sections to avoid bubbling and weird overlapping lines.

She says “This primer was awesome and dried so nicely (I almost left it like this haha). I did apply two coats to ensure all areas were covered and let it dry overnight – it was about 8 hours of drying time.”

The next day, when the primer was completely dry, she took her sea sponge and cut it into 4 pieces, one for each plate (cut the sponge in half and then cut it in half again). The paint is numbered 2a, 2b, and 2c (it comes with two of these cans in case you want a brighter finish). Kristy says “I only ended up using half of one – there was a lot of extra paint left over so I’ll be doing my husband’s bathroom to match.” Lucky her!! Good thing this project isn’t too difficult.

Next, she poured a small amount of paint on each paper/foam plate with enough room to “dab” (you’ll see there’s a small black piece of paper on the floor in the middle picture below which came with the kit to mimic the counter – this will help you practice your sponge painting). She worked the sponge paint on in 2×2 sections at a time – overlapping the 2a, then 2b, and then 2c paint. She says “You’ll want to use all these colors together before letting them dry (it comes out nicely when they dry together). Allow 4 hours of drying time before adding another coat of 2c (this will give you the brightness you’re looking for).”

Once the second coat dried, she added the glitter topcoat – eeek! She says “Work in strokes and don’t overlap – you’ll be able to add another coat once it’s dry. I should add that because my sink is built into the countertop, I used a sponge brush to do the sink as the roller would not work on it.” While she waited for the first coat of topcoat to finish drying, she started painting the cabinets.

Early Grey Cabinet Paint Kit | All Color Paint Kits
Woah, look at that shine!! Kristy used soap and warm water to wipe down dirty surfaces and remove any dust that may have accumulated. After a couple of hours passed and the first topcoat was dry, she added the second coat. She says, “This kit was so easy to use – no extra priming or stripping was necessary! I could not be more satisfied and the best part is that it comes in multiple colors, so there is definitely an option for everyone.”
When the countertop was done, it was time to install the faux tile backsplash. Kristy says, “These tiles were so EASY to use and STICK SO WELL!!! Be careful, though, because these are thin and can easily rip if not done properly. I started in the left hand corner and worked my way up – be sure to place the ‘overlapping’ sides away from the wall. These 3-D backsplash stickers are thin enough to easily cut with scissors, but they stick so well that unless I’m planning to sand and repaint my walls, these aren’t going anywhere. These are hands down my favorite – what else should I add backsplash too??” Hmmm…another DIY project to come? We shall see.

The After
And now, the moment you’ve all been waiting for…the big reveal! And to reiterate – this was done in TWO days for $275!!

Faucet | Artificial Plant | Wooden Tray
Is this not the most gorgeous transformation you’ve seen?! Look at how clean and modern the space is now…are you feeling the itch of inspiration??
Kristy says, “And just like that – with a day and a half of work and two simple kits – I have a completely different bathroom! I’d love to know how you think I did and I’d love to see your before and after pictures of your projects!”
You heard her! Give our girl some love…she definitely deserves it! Let us know what you think of her DIY bathroom renovation and what projects you’re adding to your list. If you’re looking for more tutorials, check on this post about Kristy’s kitchen pantry makeover!

Happy Monday Frugal & Thrivers!! We have a fun little treat for you all today, courtesy of our F&T queen bee, Kristy. In just two days, and for less than $300 (yes, you read that correctly) she revamped her master bathroom vanity area, taking it from outdated to outstanding. We gave you a little social media teaser of this post, and now finally, the BIG REVEAL. See how our girl did this awesome (and affordable!) renovation below.
The Before
To prepare, Kristy read a bunch of different blogs and watched a ton of YouTube videos to ensure she did this project the right way. She says, “I mean after all, I have to live with this for the rest of my life.” Smart thinking! With a wealth of new knowledge under her belt, and all her tools on hand, she was ready to begin.
The During
During her research, she found that a lot of people suggested sanding the countertop to start, so she did. But after reading the directions of the kit, she realized it wasn’t necessary, and unless you have deep nicks or bubbles on the surface, she agrees it’s a step that can be skipped. However, if you do choose to sand your countertops she recommends using a 150 grit.
Frog taping came next. She taped all the areas around the counter that she wanted to protect, like the walls and toothbrush holder, and removed the outlet cover and all fixtures (these were going to be replaced later).
After taping was done, she used a scraper to get rid of any putty build up and wiped down all surfaces using soap and warm water – she recommends not using any cleaning chemicals.
Now the fun part begins! The DIY countertop kit comes with everything shown in the picture on the right below (all you’ll need is paper plates and those paint pans) and this kit can use this on any countertop space!
White Diamond Countertop Kit | All Countertop Kits
With the countertop sanded, scraped, and wiped clean, it was time to prime. First, Kristy took the sponge brush that came in the kit and worked on the borders and small crevices that she knew the roller couldn’t get to, slowly working in small sections to avoid bubbling and weird overlapping lines.
She says “This primer was awesome and dried so nicely (I almost left it like this haha). I did apply two coats to ensure all areas were covered and let it dry overnight – it was about 8 hours of drying time.”
The next day, when the primer was completely dry, she took her sea sponge and cut it into 4 pieces, one for each plate (cut the sponge in half and then cut it in half again). The paint is numbered 2a, 2b, and 2c (it comes with two of these cans in case you want a brighter finish). Kristy says “I only ended up using half of one – there was a lot of extra paint left over so I’ll be doing my husband’s bathroom to match.” Lucky her!! Good thing this project isn’t too difficult.
Next, she poured a small amount of paint on each paper/foam plate with enough room to “dab” (you’ll see there’s a small black piece of paper on the floor in the middle picture below which came with the kit to mimic the counter – this will help you practice your sponge painting). She worked the sponge paint on in 2×2 sections at a time – overlapping the 2a, then 2b, and then 2c paint. She says “You’ll want to use all these colors together before letting them dry (it comes out nicely when they dry together). Allow 4 hours of drying time before adding another coat of 2c (this will give you the brightness you’re looking for).”
Once the second coat dried, she added the glitter topcoat – eeek! She says “Work in strokes and don’t overlap – you’ll be able to add another coat once it’s dry. I should add that because my sink is built into the countertop, I used a sponge brush to do the sink as the roller would not work on it.” While she waited for the first coat of topcoat to finish drying, she started painting the cabinets.
Early Grey Cabinet Paint Kit | All Color Paint Kits
Woah, look at that shine!! Kristy used soap and warm water to wipe down dirty surfaces and remove any dust that may have accumulated. After a couple of hours passed and the first topcoat was dry, she added the second coat. She says, “This kit was so easy to use – no extra priming or stripping was necessary! I could not be more satisfied and the best part is that it comes in multiple colors, so there is definitely an option for everyone.”
When the countertop was done, it was time to install the faux tile backsplash. Kristy says, “These tiles were so EASY to use and STICK SO WELL!!! Be careful, though, because these are thin and can easily rip if not done properly. I started in the left hand corner and worked my way up – be sure to place the ‘overlapping’ sides away from the wall. These 3-D backsplash stickers are thin enough to easily cut with scissors, but they stick so well that unless I’m planning to sand and repaint my walls, these aren’t going anywhere. These are hands down my favorite – what else should I add backsplash too??” Hmmm…another DIY project to come? We shall see.
The After
And now, the moment you’ve all been waiting for…the big reveal! And to reiterate – this was done in TWO days for $275!!
Faucet | Artificial Plant | Wooden Tray
Is this not the most gorgeous transformation you’ve seen?! Look at how clean and modern the space is now…are you feeling the itch of inspiration??
Kristy says, “And just like that – with a day and a half of work and two simple kits – I have a completely different bathroom! I’d love to know how you think I did and I’d love to see your before and after pictures of your projects!”
You heard her! Give our girl some love…she definitely deserves it! Let us know what you think of her DIY bathroom renovation and what projects you’re adding to your list. If you’re looking for more tutorials, check on this post about Kristy’s kitchen pantry makeover!

In the beginning of quarantine lots of home projects went down in my house, one of them being this frugal pantry makeover. I simply used foam board (was going to do wood but the weight would have pulled the racks out of the wall) and contact paper to give those wire racks a little upgrade! 🤩 It’s been a little over 8 months now and they are still holding up so nicely!! Everything I used is listed below, I kept a lot of my daughters items on the bottom so she can easily access them! If you have questions don’t hesitate to ask, it took me two days but was fairly easy to do!
Foam Board (I only needed one package – I still have 3 left! I used 3 for each shelf measuring 64” long). I measured the front of the wire rack and cut a separate piece from the foam board and then used packaging tape to create a “L” with the two pieces.
Contact Paper (I bought 3 for 4 shelves and still have leftover – perfect amount) use code 4SYURS68 if you buy more than 1. I used a credit card (you can use anything flat) to smooth out any bubbles as I attached the paper to the foam board.
Under shelf bookcases (I grabbed 3 because those stinking shelf holders got in the way of me grabbing a larger, longer shelf – so I improvised) Make sure you measure your shelves from the floor to the bottom of the shelf to make sure you have enough clearance to put the bookcases in.
Glass Storage Containers (I have 2 sets and use them for pasta, oatmeal, rice and candy).
1.5 Gallon Jar – I use for granola bars or cookie packs.
frugal and thriving LLC