Get ready to deck out your home with all things spooky this Halloween season…without spending a lot of money! DIY Halloween decorations are easy to make and super inexpensive. Dollar Tree has SO many great decor ideas and the supplies you need to make them!! See some of our favorite projects below along with step-by-step instructions.
Halloween Mantel

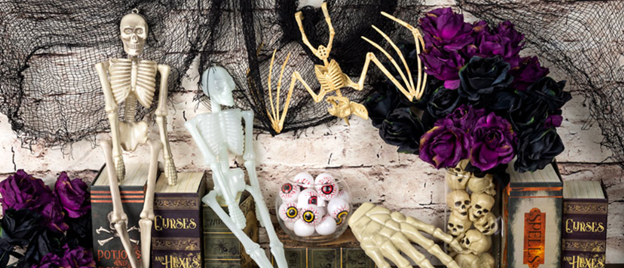
Transform your fireplace for Halloween by dressing up your mantel! Use a spooktacular variety of Halloween decorations, garlands, candles, and figurines to really make it your own. Keep it clean and modern with neutral pumpkins and candles, or get seriously spooky with skeletons, spiders, and spider webs. If you like more of a haunted feel, use potion bottles, tombstones, and flickering fairy lights.
What You’ll Need:
- Pumpkins
- Spooky Figurines
- LED String Lights
- Faux Spider Webs
- Tombstones
- Skeletons
- Garland
- Banners
- Candles
- Candleholders
Step-by-Step Directions:
- Have fun with this creation! Layer a variety of spooky elements together to create the ultimate display. Use candles, figurines, garlands, banners, spiders web, and more to make your own look
- Enjoy the Halloween ambiance at the centerpiece of your mantel all month long!
Studded & Glittered Pumpkins

Make your own sophisticated and expensive-looking decorations for just a couple of dollars! Paint a pumpkin (real or foam) black, white, or a metallic color and use a little glue, glitter, and imagination to give them a chic and edgy look.
What You’ll Need:
Step-by-Step Directions:
- Draw swirling designs or trace the natural indentations on your pumpkin with craft glue and sprinkle on glitter. When dry, brush off the loose glitter.
- Dip thumbtacks in glue, then in the color glitter of your choice (or, if you prefer, leave the tacks their original color). Let them dry, then push into foam or real pumpkins for a studded look.
- Spread glue on the entire pumpkin and glitz it out with glitter for a super-glam look.
Spooky Crystal Ball Candlesticks

Create your own creepy crystal ball candlesticks in just a few simple steps. Choose some spooky photos to put inside your “crystal balls” and use these candlesticks as a table centerpiece or mantel accents.
What You’ll Need:
- Glass Taper Candleholders
- Clear Plastic Ornaments
- Black and White “Creepy” Photos
- Scissors
- Hot Glue Gun
- Hot Glue Sticks
Step-by-Step Directions:
- Gather your supplies.
- Use scissors to cut the black and white photographs in a circle shape and size to fit the ornaments.
- Open the ornament, splitting in half. Insert the photograph into the ornament and close.
- Apply glue at the top of the candleholder and press the ornament into the glue.
- Place your crystal ball at the center of a party table or casually on a side table for a creepy effect!
Creepy Candles

These creepy candles on a silver platter are the perfect place for displaying Halloween cards or storing candy. Add scary figurines to make these candles frighteningly fun or a Halloween greeting sign to complete the look.
What You’ll Need:
- 2-pk. LED Tealight Candles
- 1 Orange Pool Noodle
- 1 Black Pool Noodle
- 1 Creepy Cloth
- 1 Silver Look Plastic Catering Tray
- 1 Hot Glue Gun
- Hot Glue Sticks
- Serrated or Electric Kitchen Knife
Step-by-Step Directions:
- Carefully cut black and orange pool noodles into various lengths between 4″ and 10″.
- Using the knife, hollow out about an inch of the middle of each length of noodle so that the LED tealight will fit securely inside. Don’t glue the candles into the pool noodles – you’ll want to be able to switch them on and off.
- Glue the bottom of each pool noodle to the tray in the arrangement you desire, then turn on the candles. Finally, drape the creepy cloth over the candles, cutting into a smaller size if needed.
Giant Lollipops

These giant lollipops are a sweet addition to your Halloween decor! Great for the garden or trunk-or-treat decorations, these are easy to make and fun to display.
What You’ll Need:
- 2 Orange Pool Noodles
- 1 Pink Pool Noodle
- 1 Purple Pool Noodle
- 2 Bamboo Skewers or Wood Dowels
- 2-pk. Basket Bags
- 1 Roll Halloween Ribbon or Deco Mesh
- 1 Hot Glue Gun
- Hot Glue Sticks
- Serrated or Electric Kitchen Knife
Step-by-Step Directions:
- Carefully cut all pool noodles in half lengthwise.
- Match different colors of half-noodles together (i.e., pink and purple, orange and purple). Use different lengths to create different sized lollipops.
- Gently roll the pieces up together and, for best results, leave curled up overnight before gluing to help keep their shape! A good trick is to wedge the coil between a table and a heavy chair to “set” overnight.
- In the morning, use hot glue to attach the halves together, then glue them back into a roll.
- Poke a wood dowel or skewer into the middle of each coil to secure, and wedge them again to let the glue dry for at least 15 minutes.
- Cover the “lollipops” in clear basket bags and secure the ends of the bags with the twist ties provided.
- Add a bow or ribbon to the base of each lollipop.
Want more decor for spooky season?? Shop all Halloween decorations and all Halloween crafting supplies from Dollar Tree. **get free shipping by having your order shipped to your nearest Dollar Tree and pick it up there!


leave a comment