
The hallways are often-neglected areas of our home, and most of the time we don’t give them much thought. They mostly serve as a means of getting from point A to point B, but that doesn’t mean they don’t need and deserve love and attention. If your hallways are currently giving off “eh” vibes, you can easily turn up the wow factor with a little paint and a few modern touches. Don’t believe us? Kristy is here to show you just how easy it is! Check out her DIY hallway revamp below.
Before

I have been wanting to update my 1988 hallway since I began projects on my home – deciding what I wanted was the real question though. I began my research (aka pretty much watching millions of YouTube videos and reading a bunch of online forums), figured out a game plan, and gathered the supplies I’d need. A little detail on this hallway makeover: I’m never afraid of a little challenge, but this was my first time using power tools for a home renovation project, and let’s just say my entire family was on edge. I was also a tad nervous, but I was ready!
During

I immediately began by pulling all the old trim off the walls. I used a flathead and hammer to wedge and separate. A little bit of good, old-fashioned elbow grease got this part done in no time!

Once the trim was removed, I measured out where I wanted my boards to go and how far apart I wanted each one to be. After that was finished, I headed to Home Depot and picked out my trim for the baseboards and the walls. I recently had a renovation done and the contractor used this trim that I just loved, so I went with that same look.

I sat in the aisle at the store cutting board by board before I told myself, “I WILL NOT be doing this my whole project!!” That’s when I decided, “I’m getting an electric saw!” BEST DECISION EVER. The tool I grabbed was perfect for my project – my boards weren’t too thick, so the cuts were very precise. I used the blade that was included, but I recommend grabbing a few extra blades just in case. I began cutting my wood with my jigsaw tool. As I mentioned, this was my first experience with power tools, and this was a GREAT introduction tool. Now I feel like I need to do many more projects with this…it honestly was a great stress releaser!!

After the pieces were cut, I began gluing them to their designated spots with my wood adhesive, and then I followed it with my nail gun to ensure that it would stay in place! Brad nails were perfect for this project because they are so small, it doesn’t even look like nails were used. Tip: make sure you grab nails that fit your nail gun!

Once the boards were in place, I started with the caulking. I’m obsessed with this process for some reason – I really enjoyed smoothing out each crevice with my finger. I am a hands-on type of person, and this wasn’t my first time using caulk, so it was easier for me to do it this way. You can also purchase a special tool to help smooth it out, though! Don’t forget to caulk any holes from your Brad nail gun too, and then let the caulk dry overnight. Once the caulk had completely dried, I went over and sanded any areas that needed smoothing. If you have holes that need patching, I recommend doing that at the same time as your caulking.

After the sanding was done, I was so ready to get the paint on the walls. I fell in love with the color “Fine Black” by Magnolia Homes, which I had grabbed from Ace Hardware, and then picked a traditional white which I got from Home Depot. Once I started painting, the transformation really started to come to life!! I couldn’t put my paint brush down because I was so excited to see the finished product. I ended up using two coats of paint for both the black and white.
After
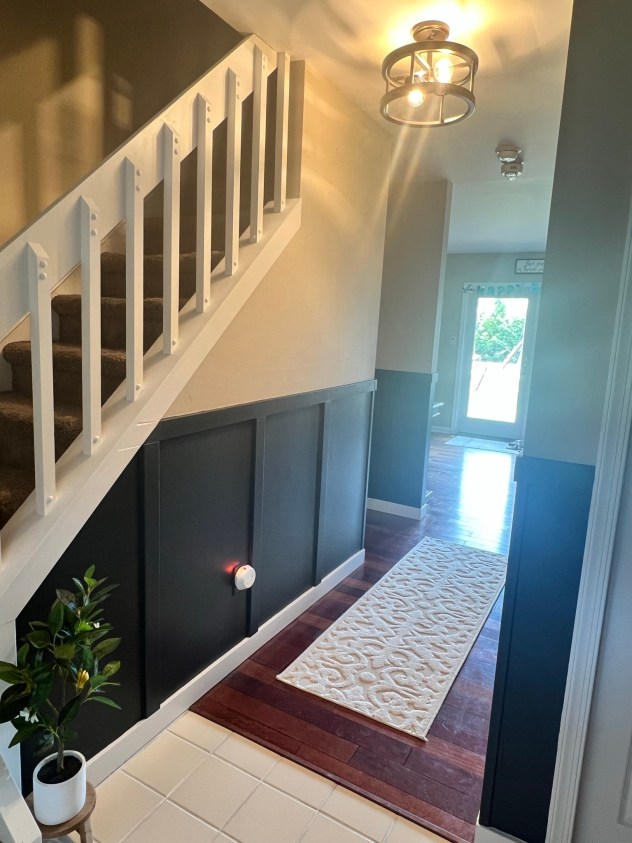
This project took me a total of 4 days and was worth every minute! I replaced the ceiling light with this new fixture and installed dimmable bulbs, and I added collages of family photos on every wall. It has made my 80’s home feel way more updated and CLEAN, and walking down my hallway gives me such a warm and inviting feel as I take a trip down memory lane. If I can do this with very minimal experience, there’s no doubt in my mind that you can too!
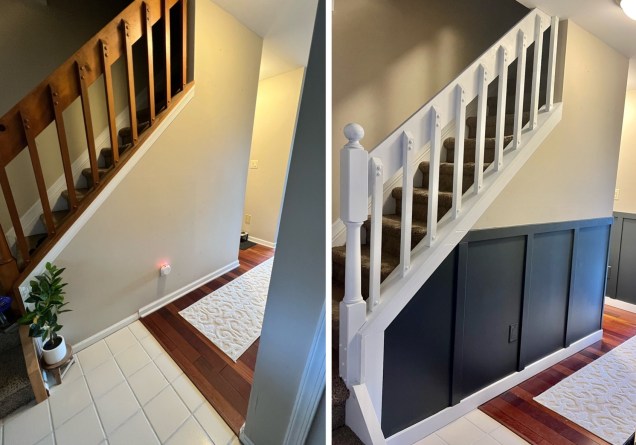
Such subtle changes can make the biggest differences! The revamped space looks so much more contemporary and open, and it’s a lot brighter now. Eventually I’ll redo the stairway too, but that’s a project for another day!


leave a comment