Graduation season is almost upon us, and as you’re getting ready to close out one chapter with your grad and begin a new one, it’s a good time to start thinking about a gift to congratulate them on their incredible accomplishments. Whether you know a student finishing high school or college, these gift ideas will carry them from one journey to the next. See our graduation gift guide below.

1 | 2 | 3 | 4 | 5 | 6 | 7 | 8 | 9 | 10 | 11 | 12 | 13
1. Noise-cancelling headphones will help block out loud roommates, chatty coworkers, or anything else that distracts them from getting *ish* done.
2. A wireless charging station for all of their techy gadgets will be the gift they use time and time again. Why does everything always need to be charged?!
3. Jewelry is a sentimental way to celebrate the grad. This compass necklace or bracelet will serve as a reminder to follow their own path.
4. A book of lessons, wise words, and funny anecdotes will inspire, instill joy, and provide a little motivation.
5. This inspirational makeup bag, filled with all her favorites and maybe a gift card or two, would make a great gift!
6. A weighted blanket will keep them warm, help reduce anxiety, and replicate a warm hug from mom when she’s miles away.
7. The tassel was worth the hassle! These funny socks would make the perfect addition to a DIY graduation gift basket.
8. And if they’re a coffee lover, this mug is another basket filler that will get tons of use.
9. A tool kit is a must!! This is one of those gifts that they don’t know they want but will be grateful they have when they’re in a pinch.
10. This phone wallet is super convenient. Pop it on the back of your phone, tuck your cards and cash in, and boom…out the door you go.
11. This themed gift box comes with an “adult merit badge” coffee mug, 400 different fun facts, and a motivational book—a little bit of everything!
12. A 3-piece luggage set will get a bunch of mileage. While they make think it will be for all of their exotic adventures, their broke selves will really be using it for all their trips back home so they can do laundry for free.
13. Who doesn’t love a sweet treat?? This tin of delicious cookies will be gone in the blink of an eye, but the sugar high will keep them going for hours.
Shop Graduation Gifts


The hallways are often-neglected areas of our home, and most of the time we don’t give them much thought. They mostly serve as a means of getting from point A to point B, but that doesn’t mean they don’t need and deserve love and attention. If your hallways are currently giving off “eh” vibes, you can easily turn up the wow factor with a little paint and a few modern touches. Don’t believe us? Kristy is here to show you just how easy it is! Check out her DIY hallway revamp below.
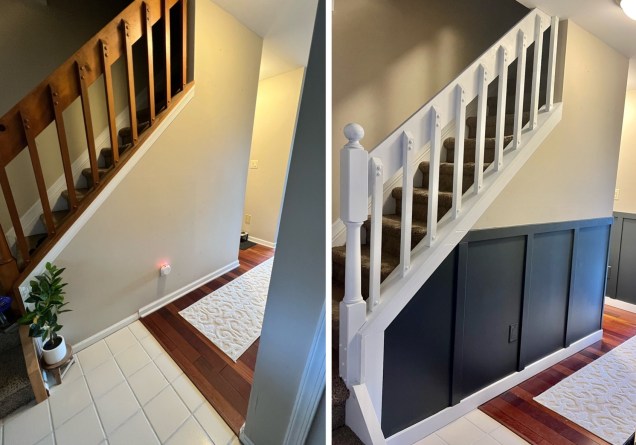
Before

I have been wanting to update my 1988 hallway since I began projects on my home – deciding what I wanted was the real question though. I began my research (aka pretty much watching millions of YouTube videos and reading a bunch of online forums), figured out a game plan, and gathered the supplies I’d need. A little detail on this hallway makeover: I’m never afraid of a little challenge, but this was my first time using power tools for a home renovation project, and let’s just say my entire family was on edge. I was also a tad nervous, but I was ready!
During

I immediately began by pulling all the old trim off the walls. I used a flathead and hammer to wedge and separate. A little bit of good, old-fashioned elbow grease got this part done in no time!

Once the trim was removed, I measured out where I wanted my boards to go and how far apart I wanted each one to be. After that was finished, I headed to Home Depot and picked out my trim for the baseboards and the walls. I recently had a renovation done and the contractor used this trim that I just loved, so I went with that same look.

I sat in the aisle at the store cutting board by board before I told myself, “I WILL NOT be doing this my whole project!!” That’s when I decided, “I’m getting an electric saw!” BEST DECISION EVER. The tool I grabbed was perfect for my project – my boards weren’t too thick, so the cuts were very precise. I used the blade that was included, but I recommend grabbing a few extra blades just in case. I began cutting my wood with my jigsaw tool. As I mentioned, this was my first experience with power tools, and this was a GREAT introduction tool. Now I feel like I need to do many more projects with this…it honestly was a great stress releaser!!

After the pieces were cut, I began gluing them to their designated spots with my wood adhesive, and then I followed it with my nail gun to ensure that it would stay in place! Brad nails were perfect for this project because they are so small, it doesn’t even look like nails were used. Tip: make sure you grab nails that fit your nail gun!

Once the boards were in place, I started with the caulking. I’m obsessed with this process for some reason – I really enjoyed smoothing out each crevice with my finger. I am a hands-on type of person, and this wasn’t my first time using caulk, so it was easier for me to do it this way. You can also purchase a special tool to help smooth it out, though! Don’t forget to caulk any holes from your Brad nail gun too, and then let the caulk dry overnight. Once the caulk had completely dried, I went over and sanded any areas that needed smoothing. If you have holes that need patching, I recommend doing that at the same time as your caulking.

After the sanding was done, I was so ready to get the paint on the walls. I fell in love with the color “Fine Black” by Magnolia Homes, which I had grabbed from Ace Hardware, and then picked a traditional white which I got from Home Depot. Once I started painting, the transformation really started to come to life!! I couldn’t put my paint brush down because I was so excited to see the finished product. I ended up using two coats of paint for both the black and white.
After
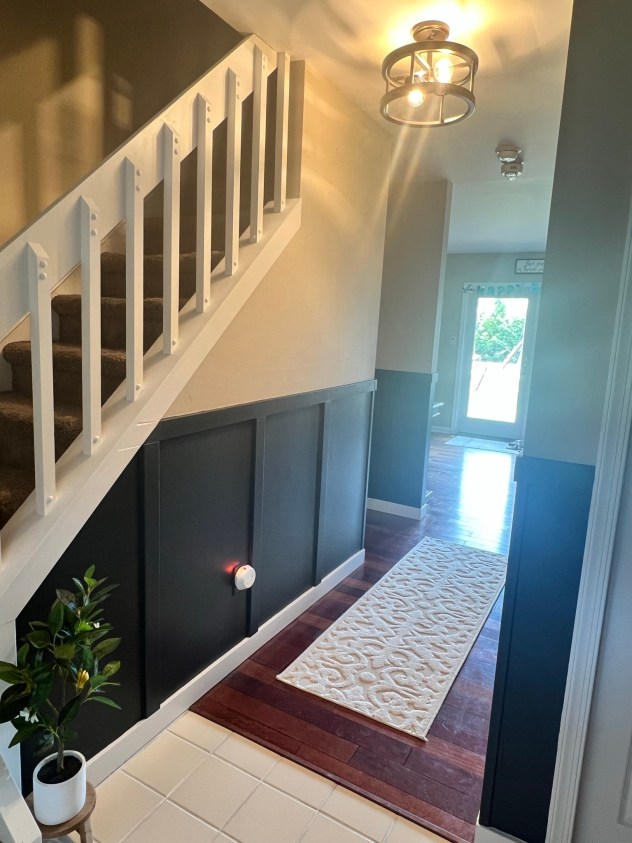
This project took me a total of 4 days and was worth every minute! I replaced the ceiling light with this new fixture and installed dimmable bulbs, and I added collages of family photos on every wall. It has made my 80’s home feel way more updated and CLEAN, and walking down my hallway gives me such a warm and inviting feel as I take a trip down memory lane. If I can do this with very minimal experience, there’s no doubt in my mind that you can too!
Such subtle changes can make the biggest differences! The revamped space looks so much more contemporary and open, and it’s a lot brighter now. Eventually I’ll redo the stairway too, but that’s a project for another day!
The hallways are often-neglected areas of our home, and most of the time we don’t give them much thought. They mostly serve as a means of getting from point A to point B, but that doesn’t mean they don’t need and deserve love and attention. If your hallways are currently giving off “eh” vibes, you can easily turn up the wow factor with a little paint and a few modern touches. Don’t believe us? Kristy is here to show you just how easy it is! Check out her DIY hallway revamp below.
Before
I have been wanting to update my 1988 hallway since I began projects on my home – deciding what I wanted was the real question though. I began my research (aka pretty much watching millions of YouTube videos and reading a bunch of online forums), figured out a game plan, and gathered the supplies I’d need. A little detail on this hallway makeover: I’m never afraid of a little challenge, but this was my first time using power tools for a home renovation project, and let’s just say my entire family was on edge. I was also a tad nervous, but I was ready!
During
I immediately began by pulling all the old trim off the walls. I used a flathead and hammer to wedge and separate. A little bit of good, old-fashioned elbow grease got this part done in no time!
Once the trim was removed, I measured out where I wanted my boards to go and how far apart I wanted each one to be. After that was finished, I headed to Home Depot and picked out my trim for the baseboards and the walls. I recently had a renovation done and the contractor used this trim that I just loved, so I went with that same look.
I sat in the aisle at the store cutting board by board before I told myself, “I WILL NOT be doing this my whole project!!” That’s when I decided, “I’m getting an electric saw!” BEST DECISION EVER. The tool I grabbed was perfect for my project – my boards weren’t too thick, so the cuts were very precise. I used the blade that was included, but I recommend grabbing a few extra blades just in case. I began cutting my wood with my jigsaw tool. As I mentioned, this was my first experience with power tools, and this was a GREAT introduction tool. Now I feel like I need to do many more projects with this…it honestly was a great stress releaser!!
After the pieces were cut, I began gluing them to their designated spots with my wood adhesive, and then I followed it with my nail gun to ensure that it would stay in place! Brad nails were perfect for this project because they are so small, it doesn’t even look like nails were used. Tip: make sure you grab nails that fit your nail gun!
Once the boards were in place, I started with the caulking. I’m obsessed with this process for some reason – I really enjoyed smoothing out each crevice with my finger. I am a hands-on type of person, and this wasn’t my first time using caulk, so it was easier for me to do it this way. You can also purchase a special tool to help smooth it out, though! Don’t forget to caulk any holes from your Brad nail gun too, and then let the caulk dry overnight. Once the caulk had completely dried, I went over and sanded any areas that needed smoothing. If you have holes that need patching, I recommend doing that at the same time as your caulking.
After the sanding was done, I was so ready to get the paint on the walls. I fell in love with the color “Fine Black” by Magnolia Homes, which I had grabbed from Ace Hardware, and then picked a traditional white which I got from Home Depot. Once I started painting, the transformation really started to come to life!! I couldn’t put my paint brush down because I was so excited to see the finished product. I ended up using two coats of paint for both the black and white.
After
This project took me a total of 4 days and was worth every minute! I replaced the ceiling light with this new fixture and installed dimmable bulbs, and I added collages of family photos on every wall. It has made my 80’s home feel way more updated and CLEAN, and walking down my hallway gives me such a warm and inviting feel as I take a trip down memory lane. If I can do this with very minimal experience, there’s no doubt in my mind that you can too!
Such subtle changes can make the biggest differences! The revamped space looks so much more contemporary and open, and it’s a lot brighter now. Eventually I’ll redo the stairway too, but that’s a project for another day!
Kristy has been slowly renovating and redoing rooms in her home over the past year or so (check out her bathroom, living room, kitchen, and pantry redos) and next on her list was her detached garage! She had a vision for turning the space into a game room where she could hang out and relax with her husband, host family on holidays, and have a place for her kids to enjoy with friends as they get older! See how she transformed her unfinished detached garage into a cozy hangout spot below.

The unfinished detached garage was previously being used as a storage/workout space, without any real purpose or design. It was time to make use of all of this room and get it organized!

One of the top priorities was adding a small half bath to the space. I knew that we wanted this to be a hangout spot for friends and family, and being able to have a bathroom onsite would be a huge plus!

Another game room essential – organized storage space!! I have a lot of different holiday and seasonal decor that would typically sit in my garage, creating more chaos. I knew I wanted a dedicated shelving area to keep everything I don’t use year-round safe and out of the way.

Getting all of the framing done and sheetrock up, with the bathroom and storage closet sectioned out, really made the whole space start to come together!

This is the almost-finished storage closet! I have so much space now to store all of my decor and outdoor essentials. The high shelving makes it easy to store and organize bins and larger items!

And the finished half bath! I went with a navy blue and gold decor theme to keep it clean and classy. The vanity has nice storage space underneath, and the large bathroom mirror perfectly complements the sleek gold faucet, towel ring, and toilet paper holder (not pictured). Also not pictured is the new toilet, but I went with a basic white high-efficiency model.

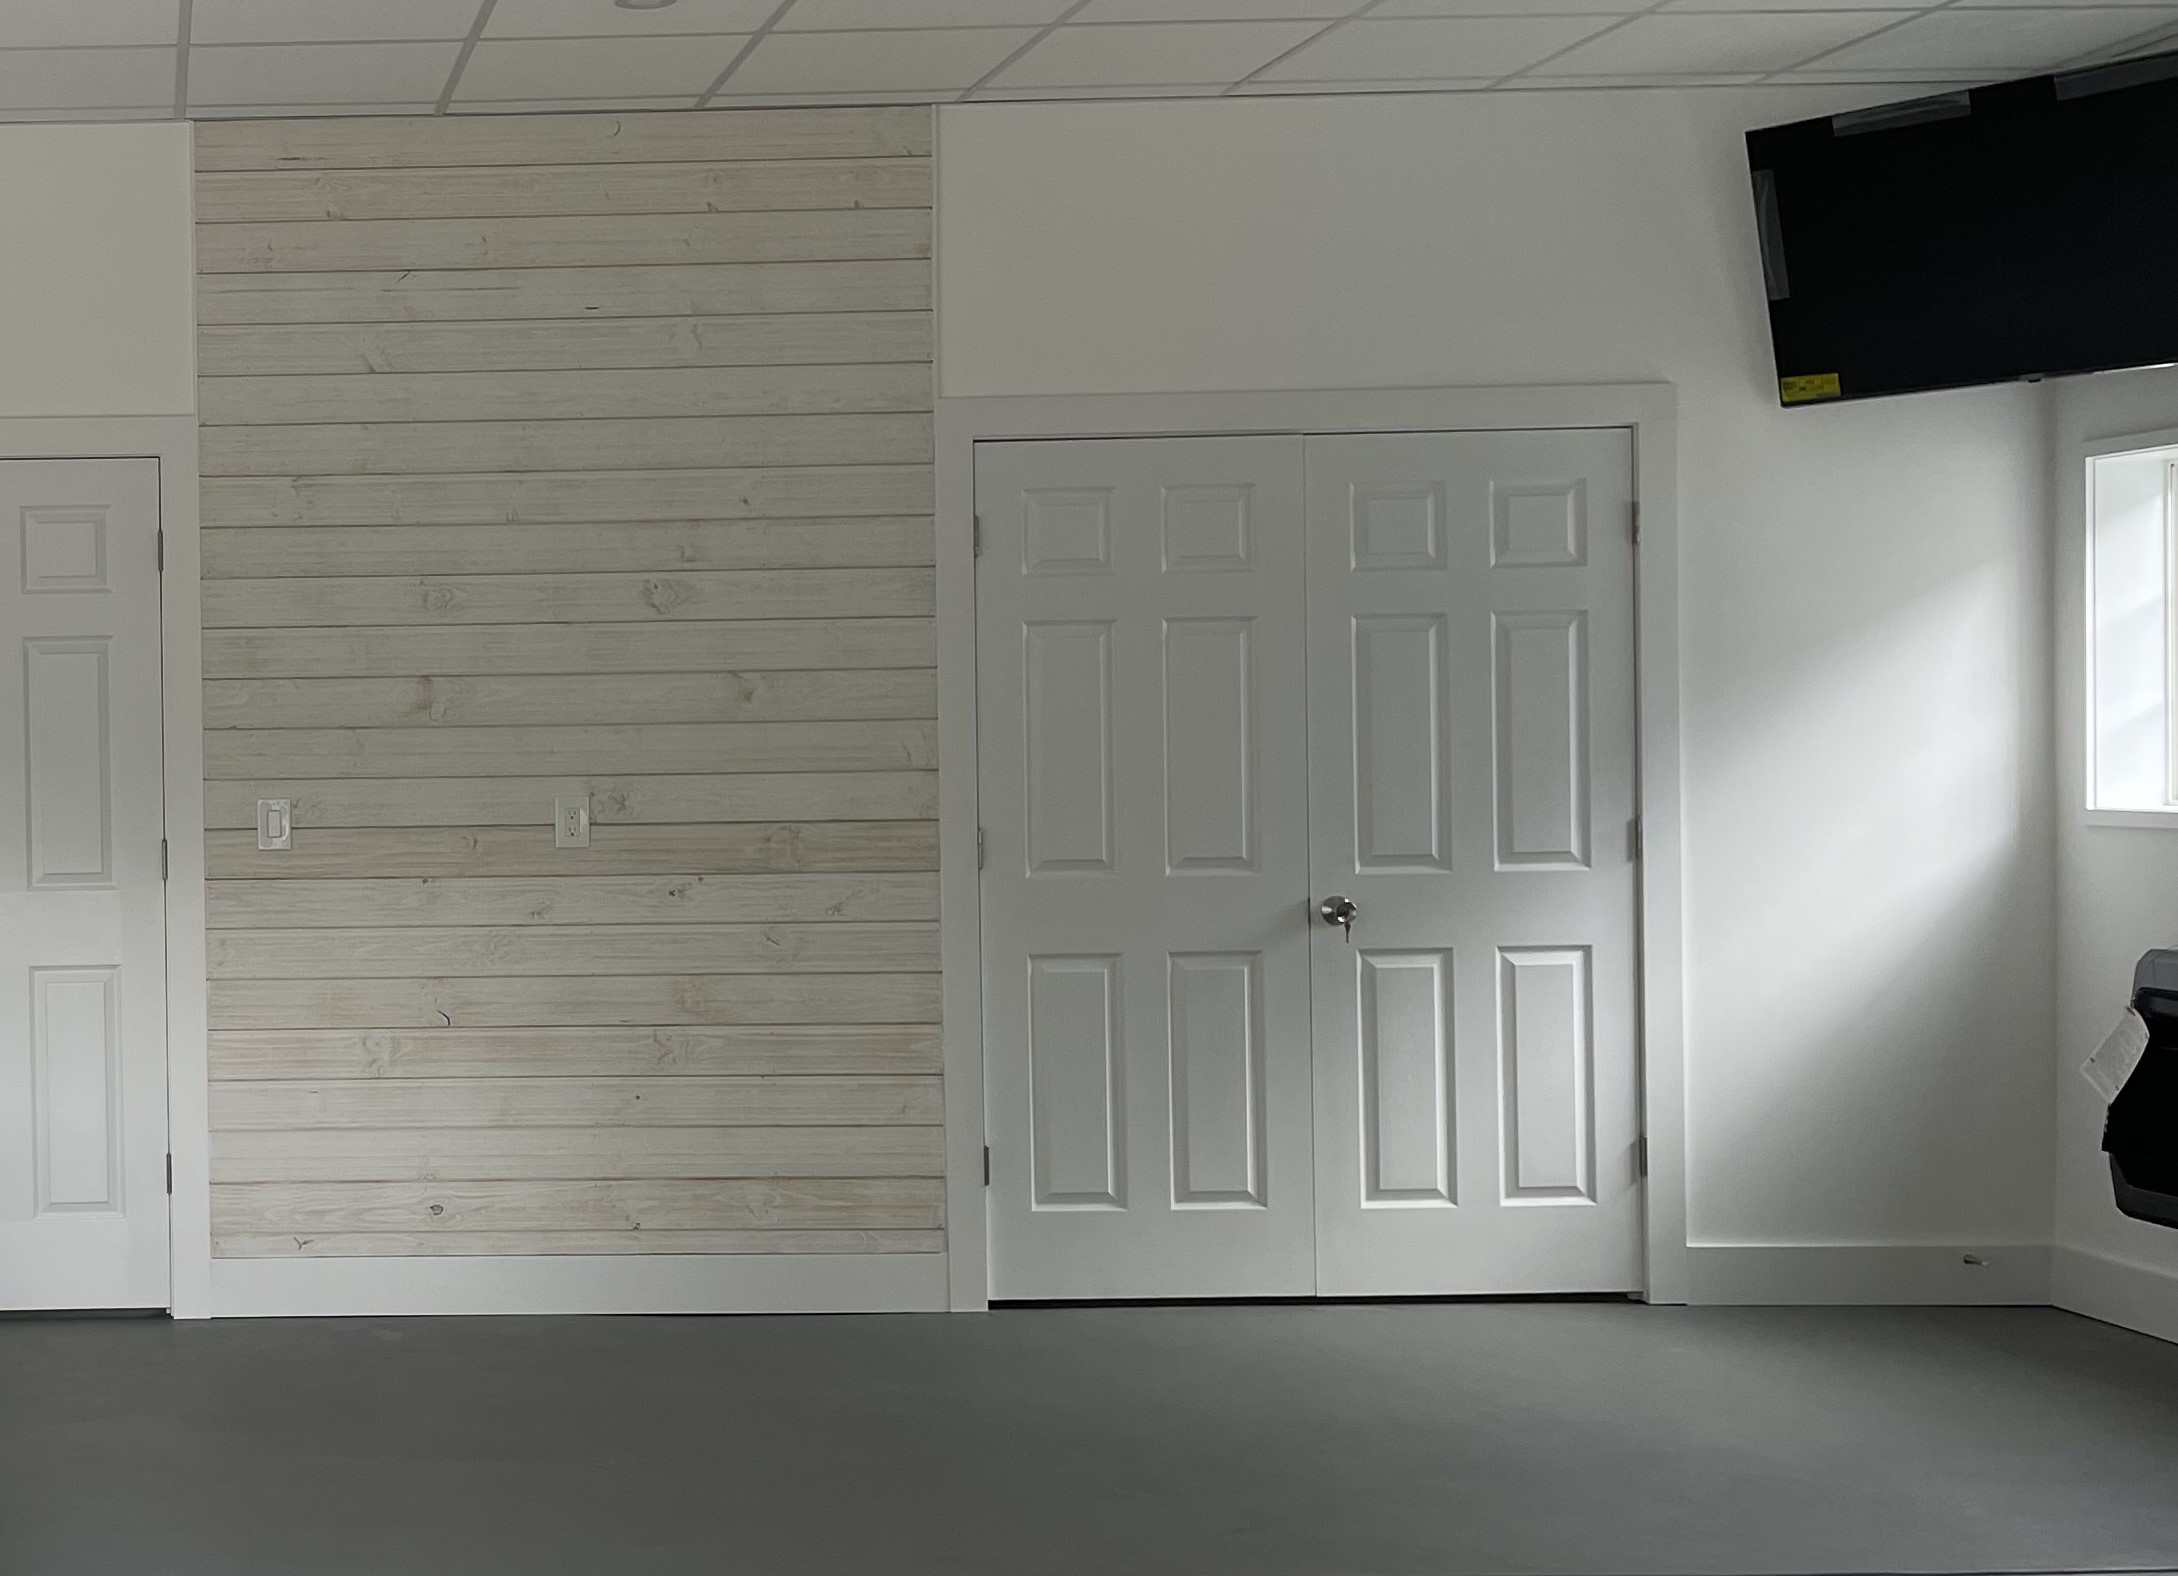
I wanted a rug that would add some style but would also hide dirt tracked in from outside and could handle a little wear and tear. This indoor/outdoor rug was just what I was looking for, and also helped carry the navy theme of the bathroom out into the main space. We also hung a TV and added a heater for those cold winter days when we still want to enjoy the space without freezing!

I love the shiplap accent wall between the two closet doors. It really helps to bring dimension to the space and makes it feel like a real extension of our home! I couldn’t be any happier with how the game room turned out. I’m excited to add all of the furniture and start hanging out in here!
We had contractors do all of the work because this was a little bit too large of a project to tackle ourselves, and we wanted to ensure everything was done correctly! We went with Making Changes, LLC, a contracting company based in South Jersey, and I would recommend them time and time again. They got the work done timely and efficiently, and they were a pleasure to work with!!
Kristy has been slowly renovating and redoing rooms in her home over the past year or so (check out her bathroom, living room, kitchen, and pantry redos) and next on her list was her detached garage! She had a vision for turning the space into a game room where she could hang out and relax with her husband, host family on holidays, and have a place for her kids to enjoy with friends as they get older! See how she transformed her unfinished detached garage into a cozy hangout spot below.
The unfinished detached garage was previously being used as a storage/workout space, without any real purpose or design. It was time to make use of all of this room and get it organized!
One of the top priorities was adding a small half bath to the space. I knew that we wanted this to be a hangout spot for friends and family, and being able to have a bathroom onsite would be a huge plus!
Another game room essential – organized storage space!! I have a lot of different holiday and seasonal decor that would typically sit in my garage, creating more chaos. I knew I wanted a dedicated shelving area to keep everything I don’t use year-round safe and out of the way.
Getting all of the framing done and sheetrock up, with the bathroom and storage closet sectioned out, really made the whole space start to come together!
This is the almost-finished storage closet! I have so much space now to store all of my decor and outdoor essentials. The high shelving makes it easy to store and organize bins and larger items!
And the finished half bath! I went with a navy blue and gold decor theme to keep it clean and classy. The vanity has nice storage space underneath, and the large bathroom mirror perfectly complements the sleek gold faucet, towel ring, and toilet paper holder (not pictured). Also not pictured is the new toilet, but I went with a basic white high-efficiency model.
I wanted a rug that would add some style but would also hide dirt tracked in from outside and could handle a little wear and tear. This indoor/outdoor rug was just what I was looking for, and also helped carry the navy theme of the bathroom out into the main space. We also hung a TV and added a heater for those cold winter days when we still want to enjoy the space without freezing!
I love the shiplap accent wall between the two closet doors. It really helps to bring dimension to the space and makes it feel like a real extension of our home! I couldn’t be any happier with how the game room turned out. I’m excited to add all of the furniture and start hanging out in here!
We had contractors do all of the work because this was a little bit too large of a project to tackle ourselves, and we wanted to ensure everything was done correctly! We went with Making Changes, LLC, a contracting company based in South Jersey, and I would recommend them time and time again. They got the work done timely and efficiently, and they were a pleasure to work with!!
frugal and thriving LLC