If there’s one thing we know how to do at Frugal and Thriving, it’s shopping a really good sale. Our job is to be on top of the hottest and latest deals from all across the internet, and we’re rounding them up and putting them all in one place for you! See this week’s best sales from some of our favorite retailers below.
Banana Republic Factory

Update your wardrobe with with sophisticated seasonal styles. Shop the Banana Republic Factory Spring Sale and get up to 50% off everything!
Carter’s

Baby fever!! Get up to 70% off all things baby from Carter’s.
Coach Outlet

Grab the perfect gift for mom!! Shop gifts from Coach Outlet for under $50.


Dick’s Sporting Goods

This sale will put a little spring in your step! Get up to 40% off running shoes for the whole family at Dick’s Sporting Goods.
Kate Spade Outlet

Grab a gorgeous new bag for spring! Kate Spade Outlet is offering an extra 20% off already-marked-down styles.


Target

Don’t miss this chance to spruce up your outdoor space! Get 30% off outdoor furniture from Target.


Walmart

Let’s get cookin’! Shop kitchen musts from Walmart for $99 or less.


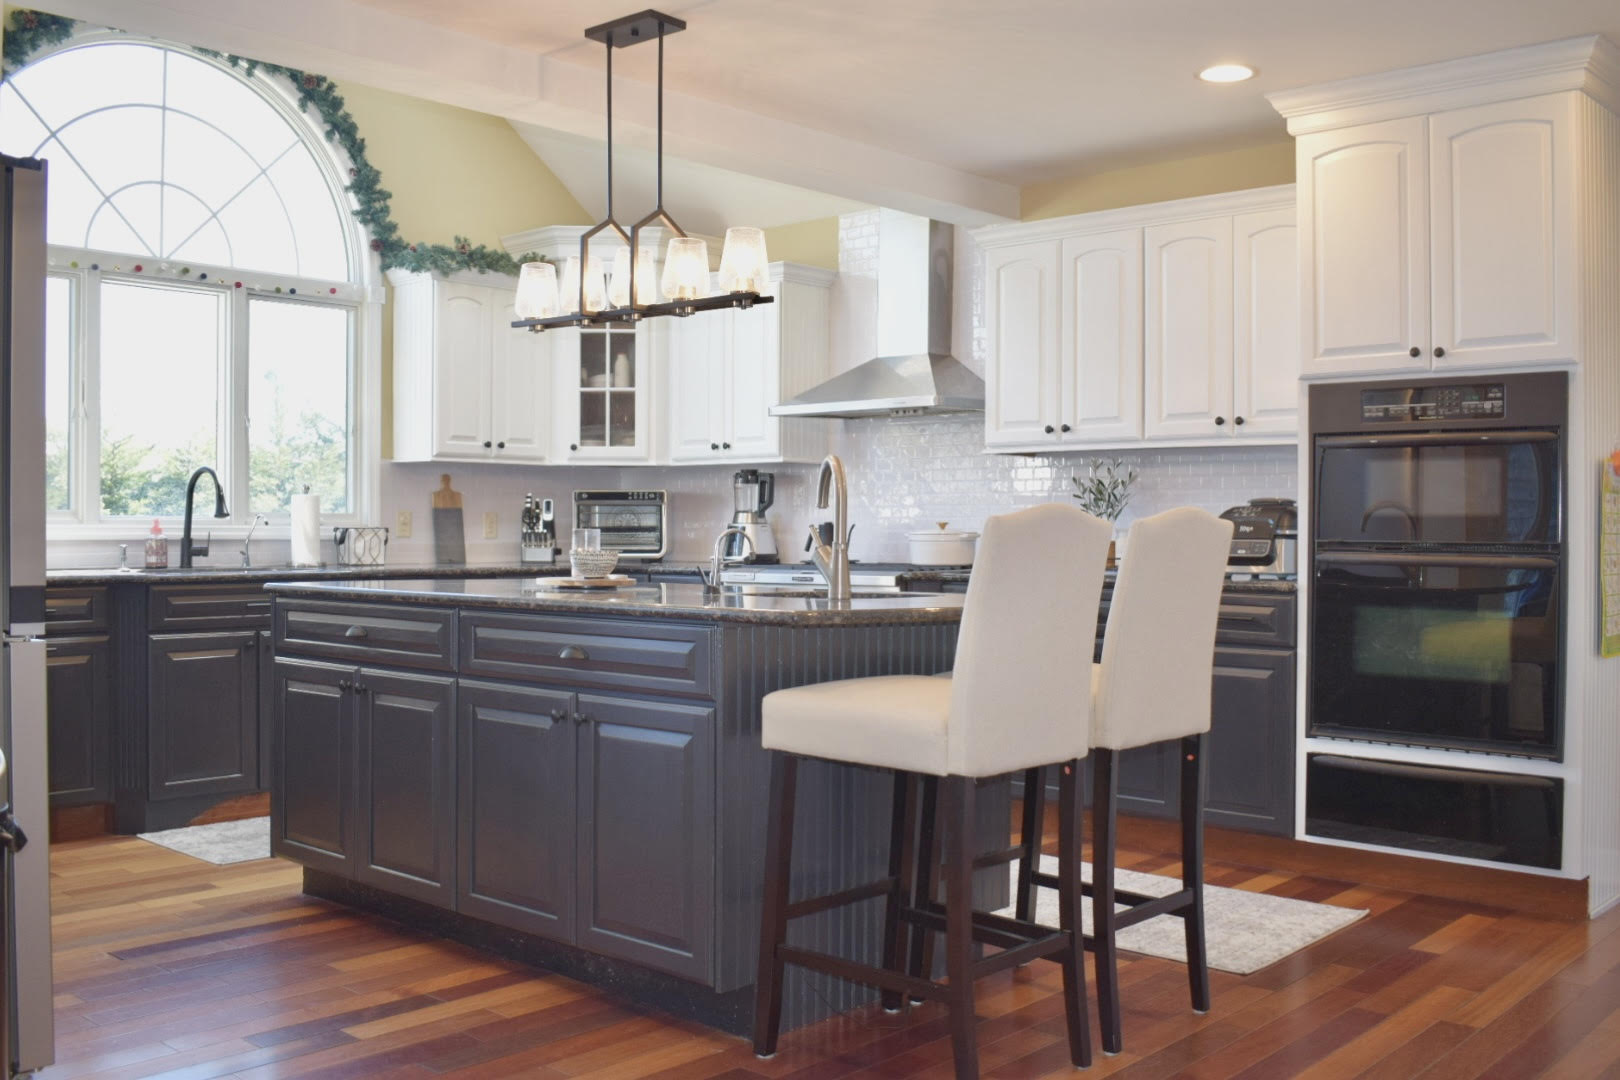
The kitchen is the heart of the house. It’s the command center where family and friends gather all throughout the day and where meals and memories are made. With all the time spent in the kitchen, you want it to be someplace that is clean yet inviting, and a space that feels like home. If your current kitchen isn’t exactly your dream kitchen, sprucing it up is a project that you can do on your own, for less money than you may think! Kristy took her kitchen from a classic okay to a bright, contemporary NO WAY!!! Check out her DIY kitchen redo.

Talk about a transformation!! Wanna know exactly how this happened? Read Kristy’s remodel process from her point of view below.
Before


Taking on this kitchen redo is something I’ve wanted to do for a while now, but to say I second-guessed this project on multiple occasions would be an understatement. I tried to talk myself out of it so many times because I was afraid to really mess something up…I mean this kitchen is the MAIN reason I wanted this home, and I didn’t want to ruin it!! But I did my research (hours and hours of it!) and really tried to mentally prepare myself for what I was getting into. It was definitely a little stressful, but I just kept envisioning the final product and how much happier I would be with my gorgeous new kitchen!! To be completely honest, this is what got me through this project, but I am so thrilled with the end result that all of the worrying was well worth it!
During

The first step was to pick out paint, and my goodness the options are endless! How is it even possible that there are about 45 different shades of black?! After much deliberation and votes cast by family and friends, I finally settled on Benjamin Moore Onyx – I wanted a sleek color that would complement the stainless-steel appliances and new black hardware for the cabinets (more on this later). I kept going back and forth on whether I wanted to do a complete one-color kitchen or if I wanted to go with a two-tone look, but after many many many internet searches, the two-tone is what I kept gravitating towards. Something about the contrast of colors really caught my eye.

After I grabbed all of my supplies, I started the leg work. I wiped all of the cabinets down with warm water and soap (I used Dawn Power Wash). I had a lot of those rubber door stoppers that had melted all over my cabinets (from the previous homeowner) and it took a lot of elbow grease to get all of that off…I may have cried multiple times just over this alone!! Once my cabinets were clean and dry, I checked them for cracks and rough surfaces. Fortunately, I have some really great wood cabinets that didn’t need any sanding. I highly recommend taking the cabinet doors off for easy painting, but if you’re afraid of stripping the screw holes, use a very small paint brush to get behind the doors (where they open and close).


Now it was time to paint!! Well, primer first, of course. I did two coats of this because I have darker cabinets and I wanted the paint to cover fully. I worked in sections because I have a 5-year-old and 3-year-old, so completely closing off my kitchen was definitely not an option. This ended up being a good thing, though, because I could see how the kitchen was coming together piece by piece, and this gave me the motivation to push through when I felt like giving up!

I waited 24 hours between priming and painting to ensure that the primer was completely dry. For the top cabinets, I used INSL-X Cabinet Coat Enamel in Satin because I didn’t want a glossy finish (but you can use a gloss if you like that look!). I did 2-3 coats of this, and I opted for using a paintbrush the entire time – I tried a roller but it just didn’t paint the way I wanted it to, and I didn’t like how it was drying. It definitely took longer this way, but I’m glad that I did it because it looks so much nicer…totally worth the extra bit of effort! The bottom cabinets are the Benjamin Moore Onyx, and I also did 2-3 coats of this.


In between drying time, I worked on my backsplash. I knew it wasn’t in my budget to redo the entire thing with tile, so I went with peel-and-stick subway tile (I used this in my DIY bathroom remodel, and it has held up so well that I knew I wanted to use the same brand for my kitchen). I would have loved to do the backsplash with real tile, but this semipermanent solution is a great substitute and I seriously love it so much!! Plus, it’s way less expensive and that’s always a win.
I highly recommend grabbing these tools to help cut and smooth out your backsplash (these were a lifesaver for me). I used about seven and a half of the tile sheets for my entire kitchen/desk area. *Tip: have patience and work slowly – this stuff is sticky and will adhere to most surfaces pretty easily, so if you mess up and you’re working on paint/sheetrock surfaces it will rip the area. However, if you’re covering it up anyway, it’s not a big deal…you’ll just lose some peel-and-stick along the way.
Prior to peeling the back off, I made sure to measure the pieces. I simply put the backsplash up against the surface I was working on and used my cutting tool to make slits where I needed to cut. Working around electrical outlets was a little tricky, but I found it easier to cut a hole in the peel-and-stick where the outlet would be instead of cutting individual pieces of peel-and-stick to place around the outlet. Once the peel-and-stick was on I used the smoother to get rid of any air bubbles.
After


And just like that, a brand-new kitchen! Okay well, it was definitely a long month of paint strokes and sore body parts, but it was worth every minute of work that I put into it!! I feel as if I live in a completely different home and every person who has stepped foot in my kitchen since the remodel has said it is so much brighter and looks way bigger. The darker color on my bottom cabinets has really brought out my wood floors and dark granite countertops, and this transformation has given me a new-found appreciation for them, too. I’ve wished for so long that I had different floors and white granite countertops, but this new look really flows well and I couldn’t be happier.

As an FYI, I have not done any sealant on the cabinets (I was told the paint I used would resist water and can be easily cleaned without damage). I can say that it’s been a few weeks and I have already cleaned milk, juice, and water off of these doors MULTIPLE times (again, kids) and they have not been affected at all. Benjamin Moore paint is meant for cabinets without any top coat – at least that’s what I’ve been told!

I previously had silver knobs and pull handles but I figured if was redoing everything, it was going to be everything. I found some great pulls and knobs (and these handles for my island) on Amazon, but you can go to your local Home Depot, Lowes, or any hardware store to find new cabinet hardware. *Tip: make sure you measure out your old fixtures before purchasing new ones…I had no idea I had two different sizes with my island drawer handles and my drawer handles throughout the kitchen. Beginner’s mistake!

I wanted to add a couple of kitchen rugs that would soften the space and help tie the floors into the cabinet and countertop color scheme. I went with this gray and white patterned runner because it matched perfectly but would also hide dirt and spills pretty easily. I got a smaller matching one for in front of the sink, too.

One of my favorite things in my new kitchen is this cute little coffee station. There used to be a roll-down door here (it’s in one of the photos above) and I kept seldom-used appliances in here, but I decided to remove the door and make it into a mini cafe! My morning cup of coffee is even more enjoyable now that I get to make it here.

If you think that you can’t do this or that you don’t have what it takes – take the leap of faith!! There may be some tears (happy, sad, and frustrated) and definitely a few bad words, but the finished product will bring you so much joy and relief it will all be worth it. And if I can do it with two toddlers and zero knowledge of doing something like this, you DEFINITELY can do it.
And if you’re looking for more remodeling inspiration, check out this DIY bathroom makeover and this modern farmhouse living room redo!
Thanks for reading!! Let us know what you think of this amazing transformation xo.
The kitchen is the heart of the house. It’s the command center where family and friends gather all throughout the day and where meals and memories are made. With all the time spent in the kitchen, you want it to be someplace that is clean yet inviting, and a space that feels like home. If your current kitchen isn’t exactly your dream kitchen, sprucing it up is a project that you can do on your own, for less money than you may think! Kristy took her kitchen from a classic okay to a bright, contemporary NO WAY!!! Check out her DIY kitchen redo.
Talk about a transformation!! Wanna know exactly how this happened? Read Kristy’s remodel process from her point of view below.
Before
Taking on this kitchen redo is something I’ve wanted to do for a while now, but to say I second-guessed this project on multiple occasions would be an understatement. I tried to talk myself out of it so many times because I was afraid to really mess something up…I mean this kitchen is the MAIN reason I wanted this home, and I didn’t want to ruin it!! But I did my research (hours and hours of it!) and really tried to mentally prepare myself for what I was getting into. It was definitely a little stressful, but I just kept envisioning the final product and how much happier I would be with my gorgeous new kitchen!! To be completely honest, this is what got me through this project, but I am so thrilled with the end result that all of the worrying was well worth it!
During
The first step was to pick out paint, and my goodness the options are endless! How is it even possible that there are about 45 different shades of black?! After much deliberation and votes cast by family and friends, I finally settled on Benjamin Moore Onyx – I wanted a sleek color that would complement the stainless-steel appliances and new black hardware for the cabinets (more on this later). I kept going back and forth on whether I wanted to do a complete one-color kitchen or if I wanted to go with a two-tone look, but after many many many internet searches, the two-tone is what I kept gravitating towards. Something about the contrast of colors really caught my eye.
After I grabbed all of my supplies, I started the leg work. I wiped all of the cabinets down with warm water and soap (I used Dawn Power Wash). I had a lot of those rubber door stoppers that had melted all over my cabinets (from the previous homeowner) and it took a lot of elbow grease to get all of that off…I may have cried multiple times just over this alone!! Once my cabinets were clean and dry, I checked them for cracks and rough surfaces. Fortunately, I have some really great wood cabinets that didn’t need any sanding. I highly recommend taking the cabinet doors off for easy painting, but if you’re afraid of stripping the screw holes, use a very small paint brush to get behind the doors (where they open and close).
Now it was time to paint!! Well, primer first, of course. I did two coats of this because I have darker cabinets and I wanted the paint to cover fully. I worked in sections because I have a 5-year-old and 3-year-old, so completely closing off my kitchen was definitely not an option. This ended up being a good thing, though, because I could see how the kitchen was coming together piece by piece, and this gave me the motivation to push through when I felt like giving up!
I waited 24 hours between priming and painting to ensure that the primer was completely dry. For the top cabinets, I used INSL-X Cabinet Coat Enamel in Satin because I didn’t want a glossy finish (but you can use a gloss if you like that look!). I did 2-3 coats of this, and I opted for using a paintbrush the entire time – I tried a roller but it just didn’t paint the way I wanted it to, and I didn’t like how it was drying. It definitely took longer this way, but I’m glad that I did it because it looks so much nicer…totally worth the extra bit of effort! The bottom cabinets are the Benjamin Moore Onyx, and I also did 2-3 coats of this.
In between drying time, I worked on my backsplash. I knew it wasn’t in my budget to redo the entire thing with tile, so I went with peel-and-stick subway tile (I used this in my DIY bathroom remodel, and it has held up so well that I knew I wanted to use the same brand for my kitchen). I would have loved to do the backsplash with real tile, but this semipermanent solution is a great substitute and I seriously love it so much!! Plus, it’s way less expensive and that’s always a win.
I highly recommend grabbing these tools to help cut and smooth out your backsplash (these were a lifesaver for me). I used about seven and a half of the tile sheets for my entire kitchen/desk area. *Tip: have patience and work slowly – this stuff is sticky and will adhere to most surfaces pretty easily, so if you mess up and you’re working on paint/sheetrock surfaces it will rip the area. However, if you’re covering it up anyway, it’s not a big deal…you’ll just lose some peel-and-stick along the way.
Prior to peeling the back off, I made sure to measure the pieces. I simply put the backsplash up against the surface I was working on and used my cutting tool to make slits where I needed to cut. Working around electrical outlets was a little tricky, but I found it easier to cut a hole in the peel-and-stick where the outlet would be instead of cutting individual pieces of peel-and-stick to place around the outlet. Once the peel-and-stick was on I used the smoother to get rid of any air bubbles.
After
And just like that, a brand-new kitchen! Okay well, it was definitely a long month of paint strokes and sore body parts, but it was worth every minute of work that I put into it!! I feel as if I live in a completely different home and every person who has stepped foot in my kitchen since the remodel has said it is so much brighter and looks way bigger. The darker color on my bottom cabinets has really brought out my wood floors and dark granite countertops, and this transformation has given me a new-found appreciation for them, too. I’ve wished for so long that I had different floors and white granite countertops, but this new look really flows well and I couldn’t be happier.
As an FYI, I have not done any sealant on the cabinets (I was told the paint I used would resist water and can be easily cleaned without damage). I can say that it’s been a few weeks and I have already cleaned milk, juice, and water off of these doors MULTIPLE times (again, kids) and they have not been affected at all. Benjamin Moore paint is meant for cabinets without any top coat – at least that’s what I’ve been told!
I previously had silver knobs and pull handles but I figured if was redoing everything, it was going to be everything. I found some great pulls and knobs (and these handles for my island) on Amazon, but you can go to your local Home Depot, Lowes, or any hardware store to find new cabinet hardware. *Tip: make sure you measure out your old fixtures before purchasing new ones…I had no idea I had two different sizes with my island drawer handles and my drawer handles throughout the kitchen. Beginner’s mistake!
I wanted to add a couple of kitchen rugs that would soften the space and help tie the floors into the cabinet and countertop color scheme. I went with this gray and white patterned runner because it matched perfectly but would also hide dirt and spills pretty easily. I got a smaller matching one for in front of the sink, too.
One of my favorite things in my new kitchen is this cute little coffee station. There used to be a roll-down door here (it’s in one of the photos above) and I kept seldom-used appliances in here, but I decided to remove the door and make it into a mini cafe! My morning cup of coffee is even more enjoyable now that I get to make it here.
If you think that you can’t do this or that you don’t have what it takes – take the leap of faith!! There may be some tears (happy, sad, and frustrated) and definitely a few bad words, but the finished product will bring you so much joy and relief it will all be worth it. And if I can do it with two toddlers and zero knowledge of doing something like this, you DEFINITELY can do it.
And if you’re looking for more remodeling inspiration, check out this DIY bathroom makeover and this modern farmhouse living room redo!
Thanks for reading!! Let us know what you think of this amazing transformation xo.
It’s that time of year when the weather is getting nicer and you’ll spend hours trying to convince your kids to put down the iPads and get outside for some much needed fresh air! If you’re struggling to find fun outdoor activities for your littles, we’ve rounded up some enticing options that will provide endless afternoons of entertainment. See our roundup below.
Toys and Games

Sensory Garden Box | Sensory Construction Box | Frisbee Golf | Inflatable Wheel | Connect 4 Game | Twangled | Nature Walk Lantern | Scavenger Hunt | Butterfly Garden | Rocket Launchers
Your kiddos will be entertained while building hand-eye coordination, dexterity, and critical thinking skills. They can tend to a butterfly garden, play a game of frisbee golf or Connect 4, or build their very own rocket launcher!

Bubble Wands | Bubble Blower | Water Blasters | Girls’ Bike | Bubble Machine | Sidewalk Chalk | Boys’ Bike | Foam Axe Thrower | Toss & Catch Game | Bubble Lawn Mower | Disc Bowling | 8-in1 Sports Set
These toys will offer hours of fun and keep your young ones active. Watch them blow bubbles, ride a bike, or bowl strike after strike.

Inflatable Pool | Soccer Goals | Water Table | Large Bounce House | Basketball Hoop | Slide | Small Bounce House | Swing Set | Cottage Playhouse
Add a (semi)permanent play fixture to your backyard so the kids can play time and time again. A swing set, basketball hoop, or inflatable pool for those sweltering summer days are all wonderful options!
DIY Birdfeeders

And if you’re looking for an easy hands-on activity you can do with your kids, these DIY birdfeeders are great for spring!!
What you need:
- Cardboard
- Scissors
- String
- Peanut Butter
- Birdseed
How to make birdfeeders:
- Cut cardboard into whatever shapes you prefer (we did hearts!)
- Punch a hole at the top and tie a piece of string into a loop
- Spread peanut butter onto both sides of cardboard cutout
- Dip onto plate of birdseed to cover peanut butter completely
- Hang feeder from tree or bush and wait for the birds to flock!

It’s that time of year when the weather is getting nicer and you’ll spend hours trying to convince your kids to put down the iPads and get outside for some much needed fresh air! If you’re struggling to find fun outdoor activities for your littles, we’ve rounded up some enticing options that will provide endless afternoons of entertainment. See our roundup below.
Toys and Games
Sensory Garden Box | Sensory Construction Box | Frisbee Golf | Inflatable Wheel | Connect 4 Game | Twangled | Nature Walk Lantern | Scavenger Hunt | Butterfly Garden | Rocket Launchers
Your kiddos will be entertained while building hand-eye coordination, dexterity, and critical thinking skills. They can tend to a butterfly garden, play a game of frisbee golf or Connect 4, or build their very own rocket launcher!
Bubble Wands | Bubble Blower | Water Blasters | Girls’ Bike | Bubble Machine | Sidewalk Chalk | Boys’ Bike | Foam Axe Thrower | Toss & Catch Game | Bubble Lawn Mower | Disc Bowling | 8-in1 Sports Set
These toys will offer hours of fun and keep your young ones active. Watch them blow bubbles, ride a bike, or bowl strike after strike.
Inflatable Pool | Soccer Goals | Water Table | Large Bounce House | Basketball Hoop | Slide | Small Bounce House | Swing Set | Cottage Playhouse
Add a (semi)permanent play fixture to your backyard so the kids can play time and time again. A swing set, basketball hoop, or inflatable pool for those sweltering summer days are all wonderful options!
DIY Birdfeeders
And if you’re looking for an easy hands-on activity you can do with your kids, these DIY birdfeeders are great for spring!!
What you need:
- Cardboard
- Scissors
- String
- Peanut Butter
- Birdseed
How to make birdfeeders:
- Cut cardboard into whatever shapes you prefer (we did hearts!)
- Punch a hole at the top and tie a piece of string into a loop
- Spread peanut butter onto both sides of cardboard cutout
- Dip onto plate of birdseed to cover peanut butter completely
- Hang feeder from tree or bush and wait for the birds to flock!
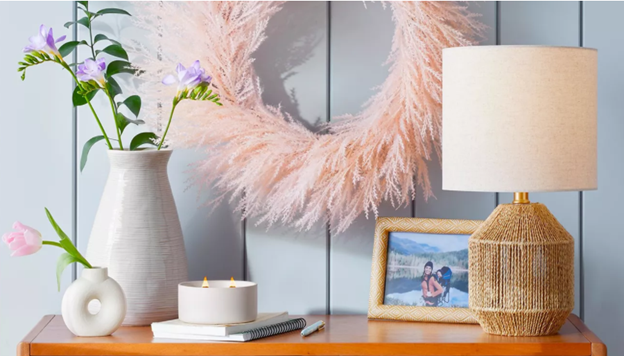
Fresh air, bright sunshine, sweet florals…spring has arrived! If you haven’t given your home a warm weather refresh yet, there is no time like the present. Clear out the winter blues and grays and make room for pretty pastels, warm neutrals, and gleaming golds. See some of our favorite spring home decor pieces from Target below.

Pretty pinks and purples, muted greens, and soft neutrals with hints of luxurious golds make for a color scheme that embodies a gorgeous spring garden. Keep this vibe classy by mixing in woven fabrics and playing with matching patterns. Throw pillows and blankets in different pastels accented with whites and beiges make the room feel bright yet comfortable, and complementary textures like metal and woven natural materials give the space character. Add cozy finishing touches with a couple of candles and a faux floral arrangement or two and your space will feel fresh and ready for spring.
Shop Spring Home Decor


Fresh air, bright sunshine, sweet florals…spring has arrived! If you haven’t given your home a warm weather refresh yet, there is no time like the present. Clear out the winter blues and grays and make room for pretty pastels, warm neutrals, and gleaming golds. See some of our favorite spring home decor pieces from Target below.
Pretty pinks and purples, muted greens, and soft neutrals with hints of luxurious golds make for a color scheme that embodies a gorgeous spring garden. Keep this vibe classy by mixing in woven fabrics and playing with matching patterns. Throw pillows and blankets in different pastels accented with whites and beiges make the room feel bright yet comfortable, and complementary textures like metal and woven natural materials give the space character. Add cozy finishing touches with a couple of candles and a faux floral arrangement or two and your space will feel fresh and ready for spring.
Shop Spring Home Decor
We’ve given the ladies a lot of fashion inspiration for spring including some really awesome transitional pieces and a simple yet beautiful capsule wardrobe, but don’t think we’ve forgotten about the kiddos! We’ve put together some fun, fresh outfits for spring that will show off your little ones’ budding styles and blossoming personalities…see the outfits below and get them geared up for the warmer weather.

Tie Dye Tee | Capri Pants | Shoes
If you’ve got an upcoming trip to Disney, or just a huge Minnie Mouse fan in your life, this pastel tie dye tee with black capri pants and slip-on shoes is cute and comfy!

Hooded Long Sleeve | Leggings | Sneakers
A hooded long sleeve top with leggings and patterned sneakers is a great option for those still-kinda-chilly early spring days!

Long Sleeve | Shorts (similar) | Sneakers
Shark sighting! A gray long sleeve top with shark-patterned shorts and slip-on shoes is a playful look for him.

Long Sleeve Top | Leggings | Shoes
She’ll be feelin’ wild in this outfit! A denim long sleeve top paired with white leggings and leopard print shoes will bring out her inner animal.

Button-Up Shirt | Shorts | Sneakers
Here comes handsome! This checked button-up shirt styled with gray shorts and high-top sneakers will have him looking springtime fine.

Flower Tee | Floral Leggings | Shoes
Watch her style bloom with this big flower tee and matching leggings. Pair with pink shoes and she’ll be lookin’ fresh!

“Love” Tee | Floral Leggings | Shoes
Peace, love, and flowers! This pretty pink tee paired with matching leggings and complementary shoes is a sweet look for spring.

Striped Polo | Shorts | Sneakers
Pair a classic striped polo with khaki shorts and skater sneakers for a warm weather look that’s as cool as he is.

Polka Dot Dress (similar) | Shoes
She’ll have a little swing in her step with this pretty polka dot dress paired with strappy flats.

Polo | Athletic Pants | Sneakers
He’ll look sporty and suave with a white polo styled with track pants and white sneakers.

Floral Top | Jeggings | Shoes
This darling daisy top has fun rouching details that gives it some extra personality. Pair it with dark jeggings and sparkling shoes.
Thanks for reading! Which of these kids’ outfits for spring do you love? Let us know xo.

We’ve given the ladies a lot of fashion inspiration for spring including some really awesome transitional pieces and a simple yet beautiful capsule wardrobe, but don’t think we’ve forgotten about the kiddos! We’ve put together some fun, fresh outfits for spring that will show off your little ones’ budding styles and blossoming personalities…see the outfits below and get them geared up for the warmer weather.
Tie Dye Tee | Capri Pants | Shoes
If you’ve got an upcoming trip to Disney, or just a huge Minnie Mouse fan in your life, this pastel tie dye tee with black capri pants and slip-on shoes is cute and comfy!
Hooded Long Sleeve | Leggings | Sneakers
A hooded long sleeve top with leggings and patterned sneakers is a great option for those still-kinda-chilly early spring days!
Long Sleeve | Shorts (similar) | Sneakers
Shark sighting! A gray long sleeve top with shark-patterned shorts and slip-on shoes is a playful look for him.
Long Sleeve Top | Leggings | Shoes
She’ll be feelin’ wild in this outfit! A denim long sleeve top paired with white leggings and leopard print shoes will bring out her inner animal.
Button-Up Shirt | Shorts | Sneakers
Here comes handsome! This checked button-up shirt styled with gray shorts and high-top sneakers will have him looking springtime fine.
Flower Tee | Floral Leggings | Shoes
Watch her style bloom with this big flower tee and matching leggings. Pair with pink shoes and she’ll be lookin’ fresh!
“Love” Tee | Floral Leggings | Shoes
Peace, love, and flowers! This pretty pink tee paired with matching leggings and complementary shoes is a sweet look for spring.
Striped Polo | Shorts | Sneakers
Pair a classic striped polo with khaki shorts and skater sneakers for a warm weather look that’s as cool as he is.
Polka Dot Dress (similar) | Shoes
She’ll have a little swing in her step with this pretty polka dot dress paired with strappy flats.
Polo | Athletic Pants | Sneakers
He’ll look sporty and suave with a white polo styled with track pants and white sneakers.
Floral Top | Jeggings | Shoes
This darling daisy top has fun rouching details that gives it some extra personality. Pair it with dark jeggings and sparkling shoes.
Thanks for reading! Which of these kids’ outfits for spring do you love? Let us know xo.
We’ve all been here: the beginning of the week rolls around, and you’ve got a million things on your mind and a hundred more on your to-do list and you realize you have no idea what is on the menu for dinners for the week. Not a good feeling. But fear not! Home Chef has got your back. Get all-in-one meal kits delivered right to your door and enjoy a healthy, home-cooked meal without all the hassle. See how you can get started and redeem your exclusive code below.

Why do we love Home Chef? Home Chef delivers simple, delicious recipes right to your door. With over 20 different menu options to choose from each week, you can go with your tried-and-true favorites or pick something new to try! These all-in-one meal kits use fresh, whole food ingredients for a quick, nutritious meal that the whole family will enjoy. And the best part? There are no strings attached! You can skip weeks you don’t need a delivery and cancellation is easy.
**For a limited time, new customers can get $90 off (that’s 10 free meals!!) with our exclusive code: FRUGALTHRIVING90

This white cheddar pasta dish with crispy prosciutto, chicken, and broccoli is creamy and filling and super easy to make!

This BBQ chicken ranch salad is a must-have!! The fresh veggies and tortilla strips add a nice bit of crunch and the BBQ and ranch give just a hint of sweetness.

This smokehouse maple chicken dish with a side of cheesy potatoes and mushrooms is a simple savory meal that will become a favorite in the rotation!

And if you want snacks and desserts for the week, add them to your order and enjoy a little bit of indulgence during your day.
Use our exclusive code: FRUGALTHRIVING90 to get $90 off (10 free meals)!! *For new customers only

We’ve all been here: the beginning of the week rolls around, and you’ve got a million things on your mind and a hundred more on your to-do list and you realize you have no idea what is on the menu for dinners for the week. Not a good feeling. But fear not! Home Chef has got your back. Get all-in-one meal kits delivered right to your door and enjoy a healthy, home-cooked meal without all the hassle. See how you can get started and redeem your exclusive code below.
Why do we love Home Chef? Home Chef delivers simple, delicious recipes right to your door. With over 20 different menu options to choose from each week, you can go with your tried-and-true favorites or pick something new to try! These all-in-one meal kits use fresh, whole food ingredients for a quick, nutritious meal that the whole family will enjoy. And the best part? There are no strings attached! You can skip weeks you don’t need a delivery and cancellation is easy.
**For a limited time, new customers can get $90 off (that’s 10 free meals!!) with our exclusive code: FRUGALTHRIVING90
This white cheddar pasta dish with crispy prosciutto, chicken, and broccoli is creamy and filling and super easy to make!
This BBQ chicken ranch salad is a must-have!! The fresh veggies and tortilla strips add a nice bit of crunch and the BBQ and ranch give just a hint of sweetness.
This smokehouse maple chicken dish with a side of cheesy potatoes and mushrooms is a simple savory meal that will become a favorite in the rotation!
And if you want snacks and desserts for the week, add them to your order and enjoy a little bit of indulgence during your day.
Use our exclusive code: FRUGALTHRIVING90 to get $90 off (10 free meals)!! *For new customers only
Every great success story has to start somewhere, and the story of Frugal and Thriving begins in a small coastal town with one mom of two kids under 5 who wanted to make life a little easier, a little more inexpensive, and a lot more enjoyable for her neighbors, friends and family, and anyone else she could possibly connect with. Her dream was to build a community where people all across the globe could share, shop, and support one another. And so Frugal and Thriving was born. In just a little over 2 years, F&T’s Founder and President, Kristy, has built a platform of almost 100,000 members that have become like family to her and her team. And now we want to show our gratitude for you!!! We’re on our way to 100K, and we’re celebrating with a pretty awesome giveaway. Read more about it below.

We’re gifting four lucky winners a 2-Burner Blackstone Griddle!! Perfect for spring cookouts with the family or summer pool parties with your friends, this griddle is a top-selling item in our group every year! How can you enter to win one? Visit our On Our Way to 100K Giveaway page and see the full details. Hint: there are multiple ways to enter!! The winner will be announced once we hit 100,000 Facebook group members, so get out there and get inviting! The more friends you invite, the closer we get to 100K and to announcing our winners.
This is a huge milestone for Kristy and the Frugal and Thriving team. What started as one badass boss lady running a business from her living room (while also balancing motherhood, taking care of a household, and being a devoted and loving wife) has turned into a team of four amazing ladies working together to bring you the best deals, sales, and products the retail industry has to offer.
We are honored to have you all along on this journey with us, and we are so excited to continue our growth in order to make all of your lives easier and more enjoyable!! Thank you for your love and support over the past couple of years…we appreciate you SO much xoxo.

Every great success story has to start somewhere, and the story of Frugal and Thriving begins in a small coastal town with one mom of two kids under 5 who wanted to make life a little easier, a little more inexpensive, and a lot more enjoyable for her neighbors, friends and family, and anyone else she could possibly connect with. Her dream was to build a community where people all across the globe could share, shop, and support one another. And so Frugal and Thriving was born. In just a little over 2 years, F&T’s Founder and President, Kristy, has built a platform of almost 100,000 members that have become like family to her and her team. And now we want to show our gratitude for you!!! We’re on our way to 100K, and we’re celebrating with a pretty awesome giveaway. Read more about it below.
We’re gifting four lucky winners a 2-Burner Blackstone Griddle!! Perfect for spring cookouts with the family or summer pool parties with your friends, this griddle is a top-selling item in our group every year! How can you enter to win one? Visit our On Our Way to 100K Giveaway page and see the full details. Hint: there are multiple ways to enter!! The winner will be announced once we hit 100,000 Facebook group members, so get out there and get inviting! The more friends you invite, the closer we get to 100K and to announcing our winners.
This is a huge milestone for Kristy and the Frugal and Thriving team. What started as one badass boss lady running a business from her living room (while also balancing motherhood, taking care of a household, and being a devoted and loving wife) has turned into a team of four amazing ladies working together to bring you the best deals, sales, and products the retail industry has to offer.
We are honored to have you all along on this journey with us, and we are so excited to continue our growth in order to make all of your lives easier and more enjoyable!! Thank you for your love and support over the past couple of years…we appreciate you SO much xoxo.
Happy Pi Day, Frugal and Thrivers!! If you remember from your school days, pi is the mathematical constant equaling approximately 3.14, which means on March 14th we get to celebrate Pi Day with…pie!! Check out our easy and delicious pie recipes below and channel your inner mathematician (and baker).
No-Bake Oreo Pie
This no-bake Oreo pie is perfect for chocolate lovers and cookie enthusiasts alike!


INGREDIENTS:
- Oreo crust (store bought or you can make your own!)
- 8 oz cream cheese
- 3/4 cup powdered sugar
- 2 cups of Cool Whip
- 10-15 Oreo cookies
For homemade pie crust:
- 25-30 Oreos
- 5 tablespoons butter
DIRECTIONS:
- Food process Oreos or crush in a zip lock bag
- In a large bowl, beat the cream cheese and powdered sugar together
- Fold in Cool Whip then add crushed Oreos
- Spoon filling into pie crust
- Place in fridge and let chill for at least an hour before serving
To make your own pie crust:
- Food process Oreos
- Mix in melted butter
- Press into a pie plate
- Put in fridge and let chill
Crustless Apple Pie
These crustless apple pies are a mini version of a timeless classic.


INGREDIENTS:
- Brioche bread
- 1 can apple pie filling
- 1 Tbsp butter
- 1/2 cup brown sugar
- 1/2 cup white sugar
- 1 tsp vanilla extract
- Ground cinnamon
- Ground nutmeg
- Splash of lemon juice
- Caramel syrup to drizzle
DIRECTIONS:
- Cut an even number of circles out of brioche bread (using cup or cookie cutter)
- Roll circles flat using rolling pin or the side of a cup
- In a bowl, combine can of apple pie filling, butter, white and brown sugar, and cinnamon and nutmeg
- Heat mixture until warm and stir thoroughly until all ingredients are mixed evenly
- Lay half of the bread circles out flat and add a scoop of pie filling on top
- Place another bread circle on top and seal the edges by pressing down with a fork
- Heat oil in a pan over medium heat
- Fry pies for about three minutes on each side
- Remove from pan, top with cinnamon, brown sugar, and caramel. Enjoy!
Air Fryer Oatmeal Apple Pies
These two-ingredient oatmeal cookie apple pies are super delicious and super easy to make!!


INGREDIENTS:
- Little Debbie’s Oatmeal Creme Pies
- Can of apple pie filling
- Caramel syrup to drizzle
- Vanilla ice cream (optional)
DIRECTIONS:
- Spray cupcake liners with non-stick cooking spray
- Make a small indentation in the middle of each creme pie and then place in cupcake liner
- Scoop apple pie filling onto pies
- Turn air fryer on to 350°
- Place pies in air fryer for 5 minutes
- Remove from air fryer and top with vanilla ice cream and caramel!
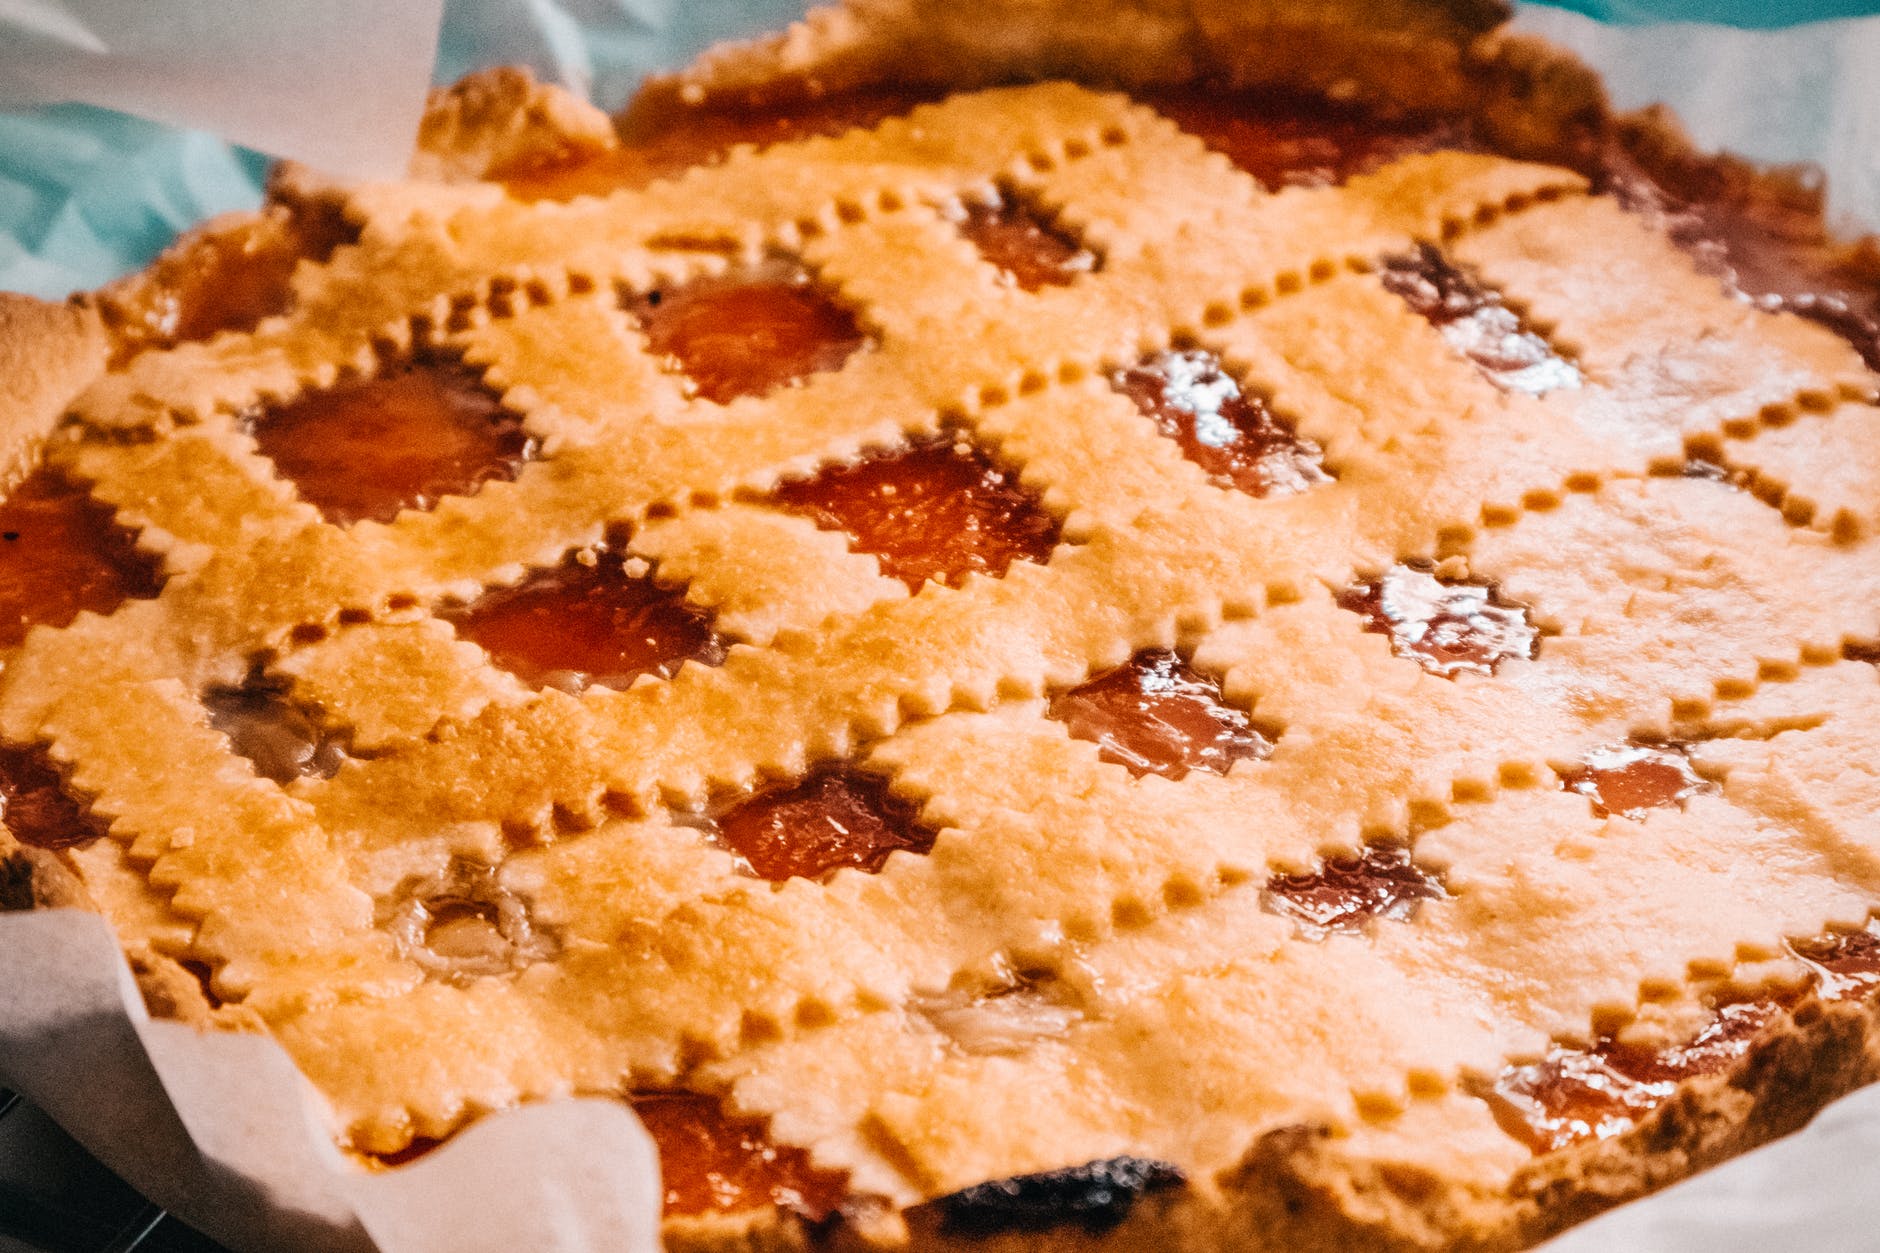
Berry Pie
For the fruit lovers, this braided-crust berry pie is as beautiful as it is tasty!


INGREDIENTS:
- 2 pie crusts
- 7 cups of frozen or fresh berries of choice
- 1 cup of sugar plus some for sprinkling on top
- 1 Tbsp lemon juice
- 4 Tbsp cornstarch
- 2 Tbsp butter
- 1 egg beaten
DIRECTIONS:
- Add berries, sugar and lemon juice to a large saucepan over medium heat
- Simmer for about 10 mins gently stirring occasionally, until warm and juicy
- Spoon out about 1/2 cup of juice from pan into a bowl and mix in the cornstarch
- Slowly pour cornstarch mixture back into pot of berries, slowly mixing in
- Bring back up to a simmer and mix until thickened (about 5 mins)
- Turn off heat and mix in butter
- Allow mixture to cool for about 15 mins
- Add to prepared unbaked pie crust
- Add lattice top or whole top with slits cut into crust for steam to escape
- Brush top with beaten egg and sprinkle with sugar
- Bake at 400° for 40-45 mins, checking halfway through – if crust is getting too brown cover with aluminum foil
- Remove from oven and let cool on wire rack
And if baking is just really not your thing, check out these expertly crafted pies from Harry & David and get an amazing pie (or two) delivered right to your door!!
Thanks for reading! Which of these delicious pies will you be celebrating Pi Day with? Let us know xo.
Happy Pi Day, Frugal and Thrivers!! If you remember from your school days, pi is the mathematical constant equaling approximately 3.14, which means on March 14th we get to celebrate Pi Day with…pie!! Check out our easy and delicious pie recipes below and channel your inner mathematician (and baker).
No-Bake Oreo Pie
This no-bake Oreo pie is perfect for chocolate lovers and cookie enthusiasts alike!
INGREDIENTS:
- Oreo crust (store bought or you can make your own!)
- 8 oz cream cheese
- 3/4 cup powdered sugar
- 2 cups of Cool Whip
- 10-15 Oreo cookies
For homemade pie crust:
- 25-30 Oreos
- 5 tablespoons butter
DIRECTIONS:
- Food process Oreos or crush in a zip lock bag
- In a large bowl, beat the cream cheese and powdered sugar together
- Fold in Cool Whip then add crushed Oreos
- Spoon filling into pie crust
- Place in fridge and let chill for at least an hour before serving
To make your own pie crust:
- Food process Oreos
- Mix in melted butter
- Press into a pie plate
- Put in fridge and let chill
Crustless Apple Pie
These crustless apple pies are a mini version of a timeless classic.
INGREDIENTS:
- Brioche bread
- 1 can apple pie filling
- 1 Tbsp butter
- 1/2 cup brown sugar
- 1/2 cup white sugar
- 1 tsp vanilla extract
- Ground cinnamon
- Ground nutmeg
- Splash of lemon juice
- Caramel syrup to drizzle
DIRECTIONS:
- Cut an even number of circles out of brioche bread (using cup or cookie cutter)
- Roll circles flat using rolling pin or the side of a cup
- In a bowl, combine can of apple pie filling, butter, white and brown sugar, and cinnamon and nutmeg
- Heat mixture until warm and stir thoroughly until all ingredients are mixed evenly
- Lay half of the bread circles out flat and add a scoop of pie filling on top
- Place another bread circle on top and seal the edges by pressing down with a fork
- Heat oil in a pan over medium heat
- Fry pies for about three minutes on each side
- Remove from pan, top with cinnamon, brown sugar, and caramel. Enjoy!
Air Fryer Oatmeal Apple Pies
These two-ingredient oatmeal cookie apple pies are super delicious and super easy to make!!
INGREDIENTS:
- Little Debbie’s Oatmeal Creme Pies
- Can of apple pie filling
- Caramel syrup to drizzle
- Vanilla ice cream (optional)
DIRECTIONS:
- Spray cupcake liners with non-stick cooking spray
- Make a small indentation in the middle of each creme pie and then place in cupcake liner
- Scoop apple pie filling onto pies
- Turn air fryer on to 350°
- Place pies in air fryer for 5 minutes
- Remove from air fryer and top with vanilla ice cream and caramel!
Berry Pie
For the fruit lovers, this braided-crust berry pie is as beautiful as it is tasty!
INGREDIENTS:
- 2 pie crusts
- 7 cups of frozen or fresh berries of choice
- 1 cup of sugar plus some for sprinkling on top
- 1 Tbsp lemon juice
- 4 Tbsp cornstarch
- 2 Tbsp butter
- 1 egg beaten
DIRECTIONS:
- Add berries, sugar and lemon juice to a large saucepan over medium heat
- Simmer for about 10 mins gently stirring occasionally, until warm and juicy
- Spoon out about 1/2 cup of juice from pan into a bowl and mix in the cornstarch
- Slowly pour cornstarch mixture back into pot of berries, slowly mixing in
- Bring back up to a simmer and mix until thickened (about 5 mins)
- Turn off heat and mix in butter
- Allow mixture to cool for about 15 mins
- Add to prepared unbaked pie crust
- Add lattice top or whole top with slits cut into crust for steam to escape
- Brush top with beaten egg and sprinkle with sugar
- Bake at 400° for 40-45 mins, checking halfway through – if crust is getting too brown cover with aluminum foil
- Remove from oven and let cool on wire rack
And if baking is just really not your thing, check out these expertly crafted pies from Harry & David and get an amazing pie (or two) delivered right to your door!!
Thanks for reading! Which of these delicious pies will you be celebrating Pi Day with? Let us know xo.
Refreshing your wardrobe for spring can be simple and inexpensive if you stick to a few basic rules! Pick staple pieces that you can mix and match and wear over and over again to get you through the season, and pick colors that you love (we’re digging florals and pastels for spring!). Fill your closet with lots of neutrals and then add a few pops of color in complementary shades. Shop our spring capsule wardrobe guide below.
Spring Wardrobe

Tops: Pick tops that are simple and lightweight and choose a variety of colors that you can mix and match. A white tank bodysuit, a white v-neck tee, a gray tee, a yellow long-sleeve top, and a baby blue sweater are all tops that say, “I’m ready for spring!” and are perfect for layering.
Bottoms: Opt for bottoms that can be dressed up or down and worn for multiple occasions. Grab a pair of light wash high-waisted jeans, neutral linen pants, a pretty floral midi skirt, and a fun floral maxi dress and wear them for work or play!
Jackets and Cardigans: Since the spring weather can be a little fickle, you’ll definitely want a few cute jacket and cardigan options you can rotate through. A button-up cardigan in dusty rose, a floral kimono, a distressed jean jacket, and a cotton twill trench coat will have you covered (literally) no matter the temperature or weather.
Shoes: Everyone knows shoes can make or break an outfit! Keep your style on point with a pair of pink rainboots, nude ankle strap heels, gray slip-on sneakers, and white strappy slide sandals.
Shop the Spring Capsule Wardrobe


Style Inspiration

Style your floral midi skirt with a white body suit, jean jacket, and white slide sandals. Or pair it with a sweater and slip-on sneakers on a chilly spring day.

Style your floral kimono with a gray or white tee or a white tank bodysuit, skinny jeans, and slide sandals.

A floral maxi dress is a great look for spring that can be dressed up or dressed down! Pair it with ankle strap heels for date night or holidays, or pair it with sandals for a more laid-back look.

Refreshing your wardrobe for spring can be simple and inexpensive if you stick to a few basic rules! Pick staple pieces that you can mix and match and wear over and over again to get you through the season, and pick colors that you love (we’re digging florals and pastels for spring!). Fill your closet with lots of neutrals and then add a few pops of color in complementary shades. Shop our spring capsule wardrobe guide below.
Spring Wardrobe
Tops: Pick tops that are simple and lightweight and choose a variety of colors that you can mix and match. A white tank bodysuit, a white v-neck tee, a gray tee, a yellow long-sleeve top, and a baby blue sweater are all tops that say, “I’m ready for spring!” and are perfect for layering.
Bottoms: Opt for bottoms that can be dressed up or down and worn for multiple occasions. Grab a pair of light wash high-waisted jeans, neutral linen pants, a pretty floral midi skirt, and a fun floral maxi dress and wear them for work or play!
Jackets and Cardigans: Since the spring weather can be a little fickle, you’ll definitely want a few cute jacket and cardigan options you can rotate through. A button-up cardigan in dusty rose, a floral kimono, a distressed jean jacket, and a cotton twill trench coat will have you covered (literally) no matter the temperature or weather.
Shoes: Everyone knows shoes can make or break an outfit! Keep your style on point with a pair of pink rainboots, nude ankle strap heels, gray slip-on sneakers, and white strappy slide sandals.
Shop the Spring Capsule Wardrobe
Style Inspiration
Style your floral midi skirt with a white body suit, jean jacket, and white slide sandals. Or pair it with a sweater and slip-on sneakers on a chilly spring day.
Style your floral kimono with a gray or white tee or a white tank bodysuit, skinny jeans, and slide sandals.
A floral maxi dress is a great look for spring that can be dressed up or dressed down! Pair it with ankle strap heels for date night or holidays, or pair it with sandals for a more laid-back look.
As we prepare for spring and the warmer weather, the Easter Bunny is getting ready to hop around the globe leaving sweet treats for all the kiddos in their baskets. And since he’s such a busy bunny, sometimes he appreciates a little help with ideas for Easter basket goodies!! If he’s paying a visit to your home this year, see our Easter basket inspiration below and let him know if you find something that catches your eye.

These umbrella baskets are perfect for the rainy springtime!! Fill them with toys, books, and clothes inspired by your little ones’ favorite characters instead of candy to give them gifts they can enjoy over and over again!
Shop Hello Kitty Umbrella Basket


Shop Light Saber Umbrella Basket


Another cute spring idea for girls is a pair of glittering rainboots and a couple floral outfits with a pastel swirl pillow animal and some of her favorite candies!!

And if you’re thinking a little further ahead, a beach chair with a bathing suit or two, some books, and a pretend pet to keep them busy during those long months off from school is a fun summer-themed basket idea.

A mini wagon filled with accessories like nail polish, lip gloss, a magic wand, and sparkly flip flops is an ideal basket idea for your little princess!

For the boys, a dump truck stuffed with athletic gear and sensory toys will keep them active and occupied for months to come!

And here’s another dump truck idea with toys and treats that he’ll jump for joy over!

We can’t forget our pets!! For your fur baby, fill a basket with dog toys and puppy treats because they deserve a little Easter love, too.
And here’s another adorable idea using a water table as an Easter basket!!
For more basket inspiration, check out our Amazon roundup of Easter basket stuffers here!

As we prepare for spring and the warmer weather, the Easter Bunny is getting ready to hop around the globe leaving sweet treats for all the kiddos in their baskets. And since he’s such a busy bunny, sometimes he appreciates a little help with ideas for Easter basket goodies!! If he’s paying a visit to your home this year, see our Easter basket inspiration below and let him know if you find something that catches your eye.
These umbrella baskets are perfect for the rainy springtime!! Fill them with toys, books, and clothes inspired by your little ones’ favorite characters instead of candy to give them gifts they can enjoy over and over again!
Shop Hello Kitty Umbrella Basket
Shop Light Saber Umbrella Basket
Another cute spring idea for girls is a pair of glittering rainboots and a couple floral outfits with a pastel swirl pillow animal and some of her favorite candies!!
And if you’re thinking a little further ahead, a beach chair with a bathing suit or two, some books, and a pretend pet to keep them busy during those long months off from school is a fun summer-themed basket idea.
A mini wagon filled with accessories like nail polish, lip gloss, a magic wand, and sparkly flip flops is an ideal basket idea for your little princess!
For the boys, a dump truck stuffed with athletic gear and sensory toys will keep them active and occupied for months to come!
And here’s another dump truck idea with toys and treats that he’ll jump for joy over!
We can’t forget our pets!! For your fur baby, fill a basket with dog toys and puppy treats because they deserve a little Easter love, too.
And here’s another adorable idea using a water table as an Easter basket!!
For more basket inspiration, check out our Amazon roundup of Easter basket stuffers here!
Whether you’re heading somewhere warm for spring break, planning a tropical vacation for the family, or just getting ready for those long, hot summer days, having a few flattering swimsuits on hand is a must!! Finding an adorable bathing suit doesn’t have to be expensive, though. These swimsuits that we love are all less than $50 and will make the perfect addition to your swimwear collection. See our swimsuits below.

Swimsuit 1 & 7: This one-piece with mesh-cutout accents is flattering for all body types and perfect for all occasions! The high neck and ruched details make this suit classy with just a touch of sultry.
Swimsuit 2: This one-shoulder bikini with tie accents is an eye-catching suit. The high-waisted bottom is slightly on the cheeky side, so this swimsuit is perfect for when you’re feeling a little more frisky!
Swimsuit 3: This fiery red leopard print one-piece is fierce! Cutout details on the back add an unexpected surprise and make this suit ideal for when you want to take a walk on the wild side.
Swimsuit 4: This strappy monokini with mesh inserts puts a playful spin on a one-piece swimsuit. The front-crossover top and banded middle create a slimming silhouette.
Swimsuit 5: This crisscross high-waisted bikini offers great coverage while still looking cute. A tie-back top and a ruched bottom make this suit a favorable fit for all body types!
Swimsuit 6: This one-shoulder one-piece with a ruffle trim is a sweet suit that’s ideal for a romantic getaway or a girl’s trip. Feel comfortable yet fashionable with ruched details and moderate coverage.
Swimsuit 8: This ruffle-sleeve deep-v bikini with a high-wasited ruched bottom is flirty and fun. The flutter sleeves offer a bit of dimension that will turn heads and make you want to move!
And if you’re looking for even more fun and flattering swimsuit styles, check out our post featuring some of Amazon’s top swimsuits!!

Whether you’re heading somewhere warm for spring break, planning a tropical vacation for the family, or just getting ready for those long, hot summer days, having a few flattering swimsuits on hand is a must!! Finding an adorable bathing suit doesn’t have to be expensive, though. These swimsuits that we love are all less than $50 and will make the perfect addition to your swimwear collection. See our swimsuits below.
Swimsuit 1 & 7: This one-piece with mesh-cutout accents is flattering for all body types and perfect for all occasions! The high neck and ruched details make this suit classy with just a touch of sultry.
Swimsuit 2: This one-shoulder bikini with tie accents is an eye-catching suit. The high-waisted bottom is slightly on the cheeky side, so this swimsuit is perfect for when you’re feeling a little more frisky!
Swimsuit 3: This fiery red leopard print one-piece is fierce! Cutout details on the back add an unexpected surprise and make this suit ideal for when you want to take a walk on the wild side.
Swimsuit 4: This strappy monokini with mesh inserts puts a playful spin on a one-piece swimsuit. The front-crossover top and banded middle create a slimming silhouette.
Swimsuit 5: This crisscross high-waisted bikini offers great coverage while still looking cute. A tie-back top and a ruched bottom make this suit a favorable fit for all body types!
Swimsuit 6: This one-shoulder one-piece with a ruffle trim is a sweet suit that’s ideal for a romantic getaway or a girl’s trip. Feel comfortable yet fashionable with ruched details and moderate coverage.
Swimsuit 8: This ruffle-sleeve deep-v bikini with a high-wasited ruched bottom is flirty and fun. The flutter sleeves offer a bit of dimension that will turn heads and make you want to move!
And if you’re looking for even more fun and flattering swimsuit styles, check out our post featuring some of Amazon’s top swimsuits!!
frugal and thriving LLC